Condo Blues: paint project
Showing posts with label paint project. Show all posts

Monday, April 8, 2013

How to Make a Simple Shelf with Recycled Fence Boards

Hands up. Who does not want more storage space in their bathroom?

Anyone?

I thought so. Me too.

I keep an extra bottle of shampoo, toiletries, etc.around because if I run out of something it is when I am in the middle of using it. Keeping an extra on deck also allows me to buy the plant based items we like to use when they go on sale for Earth Day. I buy them now and save them for later.

I need a place to store/hide/stuck this stuff in my small house, preferably in the bathrooms where I will be using it. It should be accessible but also hidden because no one needs to stare at my big bottle of castile soap waiting to be opened.

I have just the place – over the bathroom door.

To keep this year’s DIY New Year's Resolution, I’m going to use what I have on hand first. 

I hung a pair of plaster corbels from our old place in the master bathroom because I didn’t know what to do with that wall (I still don’t.) They aren’t working as little display shelves. I think they will work better as shelf supports.


I will use the second corbel to make an over the door shelf for the master bathroom.

Thursday, March 14, 2013

11 Painting Tips and Tricks

Friends invited Husband and I to an apartment painting party to prep the place for a new tenant.  While we painted and before the pizza guy delivered we traded painting tips and tricks. Some you may know, others you may not. Feel free to add your tips in the comments section below!


1. Check for lead. If your home was built or painted prior to 1978 (when the US banned lead paint), it is a good idea to test the surface with a lead testing kit (you can find them here) before sanding or scraping peeling paint. If the test is positive for lead paint check HUD's Field GuideLead Paint Safety at to learn how to do the work safely or consider hiring a pro.

2. Prep it. Preparing the walls for paint is not as fun as diving right in there with a brush, but it will make the project easier in the end. Fill cracks and holes with spackle, let it dry and the sand it smooth with a sanding block, and then wipe the area with a lint free rag. If the walls are dirty, wash them down with water and dish soap,  and let them dry before painting or priming. Scrap and sand peeling or chipping paint. Mask off moldings and any area you do not want to paint  with painters tape. Not sure what type of tape to use? Check out my painter's tape vs masking tape post here.

painting around wood trim
 Painting the window molding would be a crime against architecture. We masked it off with painters tape to avoid accidents when cutting in around the windows and fireplace.

Thursday, February 7, 2013

Industrial Chalkboard Table


How I envy Lilyfield Life! She found a dining room table in her neighbor’s garbage and snatched it up before the trash truck could take it away to the land fill. She worked some magic with chalkboard and red paint (two of my favorite things) and turned that trashy table into this industrial beauty.

Can you believe someone threw this out?!


I wish Husband would let me do the same to our dining room table. It was his parent's table and has seen better days. He won't let me paint the beat up old thing time warn patina. We compromise with an small army of table cloths.

What do you think? Painted wood tables - yay or any?


Did you enjoy this post? Get more like it by subscribing to the Condo Blues RSS Feed or to Condo Blues by Email.

Friday, February 1, 2013

Painted Thrift Store Bathroom Mirror

My upcycled mirror!
You know you nabbed a good thrift store find when two strangers walking into the store compliment you on the beat up mirror you are carefully loading into your car trunk.


True story.

With a little spray paint love, this pealing gold paint and not in a good way mirror is going to add a little more fun and a lot more less builder standard to my guest bathroom.

I bought the mirror last fall to replace the giant builder mirror in the bathroom. Builders use these giant mirrors to make bathrooms look bigger (with varying degrees of success) and to sometimes cover up quickly done or not painted very well walls (as least this is what I am finding in my own home. *sigh*)


I'm giving the new bathroom faucet a thumbs up in this photo NOT the enormous mirror.


Let’s paint this guy!

Monday, January 14, 2013

Ohio State Michigan Barn Wood Welcome Signs

My Texas brother in law has a house.  He and his family are very welcoming people they don’t have an official sign to welcome everyone into their home.

I decided to rectify that. I made him a University of Michigan welcome sign because my brother in law is a big Michigan fan. How I don’t know. He was born and lived in Ohio for most of his life where you are supposed to root for Ohio State University from birth. I guess he gets away with it because his family does not live in Ohio anymore.


While we are talking team rivals, I figure I should even things out on the sports front and make an Ohio State University welcome sign for Mother and Father in Law’s new house while I was at it.

How to make a Barn Wood Welcome Sign

Wednesday, January 9, 2013

How to Make Kitchen Sink Cabinet Storage Shelves

I don’t have a lot of storage room under my kitchen sink. A slide out trash can (love, BTW) fills the right side of the sink cabinet. The garbage disposal fills the upper air space on the left side of the sink cabinet. Soaps and cleaners, and extras on deck hang out on the left side of the cabinet and are in the line of fire when the garage disposal violently decides it doesn’t want to connect to the waste water pipe and floods the cabinet with water and food goo.

After trying to dry out a cardboard box box full of dish washing powder three times in two days, I figured it was time to install shelves under the sink to keep my extras high and dry.

Keep reading! I'll teach you how to make my wood crate shelf.

I couldn’t find what I wanted in a store. Then I remembered I have mad DIY skillz and a bunch of wood. DIY to the rescue! I designed and built a under sink shelf from an old hot sauce caddy.   

Husband likes hot sauce so much we got a Dave’s Insanity sauce gift pack like this as a wedding present. True story.

Wednesday, September 19, 2012

Barnwood Speaker Shelves

Its funny how one little DIY project like painting an accent wall turns into a tumble of DIY projects like installing a TV wall mount, updating the fireplace surround with paint, and now building barn wood shelves for the surround sound speakers. It is like eating Terra Chips around here. I can’t eat just one.

During the mounting the flat screen TV project I did as part of Husband’s birthday present, I originally wanted the surround sound speaker placement to be on the back wall around the TV for optimal sound. I realized I have more TV than TV niche wall space. Plan B: make surround sound shelves from the reclaimed wood I rescued from a broken fence.

Learn how to build these reclaimed wood display shelves. It's easy. Promise.

I feel like I should almost apologies for having a flat TV, surround sound, and TV components because in  having a TV, let alone cable and a video game system is pooh-poohed in eco circles. I’m going to address it but I’m not going to apologize for it.

Tuesday, September 4, 2012

Urban Scrawl Inspiration

Urban Scrawl MuralHusband and I have the best friends in the world. Our in real life group is so understanding of our devastating loss of Blitzkrieg. We got sympathy cards, personal calls, and condolences from an overwhelming number of friends, neighbors, our family vet, and the vet hospital oncology team. Every single one touched our hearts but none so much as Blitzkrieg's oncology nurse. She made and painted a plaster paw print she took of Blitzkrieg for us on her own. Tears I did not know I had welled up inside me when I unwrapped it.

Many of our friends are calling us for spur of the moment dinners and get togethers too. Thank you friends. Keeping busy helps.

That's how Husband and I ended up at Urban Scrawl. One of our couple friends invited us to join them at Urban Scrawl because they know we like local food and arty things.

Tuesday, May 22, 2012

DIY Cabinet Door Chalkboard

I’m crafting my tushie off for our Blitzkrieg Cancer Treatment Fund booth at the Pet Promise Rescue Run this Saturday. Please come!

Husband and I will sell Barking Mad Candles for Men (more on that in a later post), braided fleece dog chew toys, t shirt grocery shopping bags, and reclaimed wood signs. The money we raise will help pay for Blitzkrieg’s chemotherapy treatments and extra medical bills we’re having because of side effects from the chemotherapy treatments. You can read an update about Blitzkrieg here.

Chalkboard Paint Cabinet Door
Thank you for helping me!

I don’t want to spend a lot on the booth itself because we’d have to make that much more money to turn a profit and help Blitzkrieg. Christina from A Mommy Story stepped in and offered us the use of their awning for the event. She crossed a major expense off our list. Thank you Christina!
 

Wednesday, June 29, 2011

How to Make a Tabletop Cornhole Game

I build a regulation size Cornhole game for Husband’s family reunion last summer.  The game works great for home. It is too big for us to take with us in our small car if we also want to take frivolous things like food to day long summer festivals and picnics.

I drew plans for a tabletop Cornhole game.

Craftsman Blogger Summit
 Build me!

Monday, April 4, 2011

Book Page Storage Shelves

They say the cheapest way to spruce up a room is to paint it. I say cheapest way to spruce up a room is to clean and reorganize it.

The utility room is one of those rooms I walk into that makes me go ARRRRGH!

Clutter makes me cranky.

Wednesday, March 9, 2011

Garage Workshop Transformation Part 1: Paint Walls

Husband and I are going forward with turning part of our garage into a wood workshop for me. We adjusted the budget a bit due to Blitzkrieg’s knee surgery. We still plan to buy as many materials as we can for the project from the Restore.

Some of the storage and insulation extras may wait unless a good sale comes our way. This will be a cash only project.

Here’s the before.

The beer sign is how dudes decorate. That is what Husband told me as he hung it up after I banished it to felt it worked better in the garage.

Friday, October 29, 2010

Make a (Cute) No Solicitors Sign

One of the drawbacks of living in a condo community with nicely planned blocks of houses with sidewalks is that we are ripe for the picking when it comes to door to door salespeople. Now that it’s election season, it’s becoming downright unbearable! I’ve had more than one person come to the door pimping the same issue despite asking them to please take them off our visitation list. It's not that I'm politically unaware, I am more than you know. It's just that I don't want my Saturday HGTV and DIY Network coffee + snuggling doggie + dream time interrupted three times in one day with a parade of people knocking on my door about the same thing. The worst offenders are the fake water testing companies trying to tell us our water will kill us unless  we buy their product allow them to test our water.

I decided to make a No Solicitors sign.

I bought a frame at Goodwill and sanded it.
 
 It doesn't look like much but this frame is an achievement. I went to Goodwill looking for picture frames and came out of Goodwill with picture frames instead of picture frames plus the dozen other things that tempted me. Yay me!

I used leftover outdoor paint from my porch chair revamp project to paint my picture frame since it will live outside.

Tuesday, September 21, 2010

Repurposed Dog Bowl Wall Art

After I painted the kitchen, I started putting artwork back on the walls for my family’s enjoyment. One family member didn’t have anything to look at when he was eating his dinner.

Photobucket
What about me? *Sigh*

I decided to make Blitzkrieg some doggie wall art.

Tuesday, September 14, 2010

I Painted My Kitchen with No VOC Paint

For 6 years, Husband and I have been going around and around about what color to paint the kitchen. Since he is the Head Cook he wanted a say in how I decorated “His Domain.” I guess I can give him that. I’m also fine with him calling the kitchen His Domain. Heck, he can call it Shirley for all I care as long as he cooks my dinner!

Being a green blogger, I’m supposed to automatically choose a low or no VOC (volatile organic compound) paint to improve the indoor air quality for the health of my family. However, I had a lot of questions and concerns if a low or no VOC paint job would last. Turns out, my concerns were not such a big deal. I found out that we painted our bedroom six years ago with a paint that qualifies as a low VOC paint, even thought the company doesn’t advertise it that way. The bedroom paint job has held up over time but as for a low VOC paint, it SMELLED just as much as the mistint of conventional paint I bought from the Habitat Restore to paint the laundry room.


Since that stinky low VOC paint job held up over time, I was ready to take a chance on a no VOC paint. Hopefully, with less stink.

Sunday, June 20, 2010

Chalkboard Paint Outlet Covers

After I painted my kitchen backsplash with black chalkboard paint I looked at my white plastic outlet covers – they just would not do. The white plastic was just too high contrast with the black chalkboard wall.


Keep reading! I'll teach you how to paint shiny plastic outlet covers with chalkboard paint.


I wonder if I can save a few bucks and reuse what I have (very green BTW) and paint those cheap plastic outlet covers with chalkboard paint to match the wall?

White plaste builder outlet covers.

I took off the gloss with steel wool. Sandpaper works too. I used steel wool because it was only two steps to my right under the kitchen sink instead of six steps to my left in the garage. You know I am all about saving energy, fossil fuels as well as my own.

I grabbed a variety of items from the recycling bin to use as risers to make painting and priming the outlet covers easier. I primed the outlet covers using the same grey colored primer I used for the walls. Using a colored primer under a dark top coat reduces the number of extra coats of paint you will need to get nice even coverage.

Gray primer.


Once the primer was dry, I painted the outlet covers with two coats of chalkboard paint.

Black chalkboard paint outlet covers!


When everything was dry, I screwed them into the wall with the original screws and dabbed a bit a black paint on the black screws so they would match.


They blend nicely into the wall. I can draw on them too.

Ta Da! The matching chalkboard outlet covers was the final addition to my chalkboard backsplash that appears in the July/August 2010 issue of This Old House Magazine!


I'm in the July/August 2010 issue of This Old House Magazine.


I’m kinda of hooked on chalkboard paint. What shall I do next? I’m eyeing the refrigerator…


Did you enjoy this post? Get more like it by subscribing to the Condo Blues RSS Feed  or to Condo Blues by Email.


Sunday, June 13, 2010

Chalkboard Paint Kitchen Backsplash

Husband and I couldn’t agree on what type of tile we wanted to use on our kitchen backsplash. I wanted something sleek like recycled glass or stainless steel tile. He wanted a Byzantine pattern in travertine tile.

In the meantime, when I wiped the walls with nothing more than water, paint came off on my damp sponge because the builder used cheap watered down paint to paint our house. The wall needed something to protect it as we fought over what tile to use.

As a temporary fix, I broke out the chalkboard paint.

Chalkboard kitchen backsplash!

Thursday, May 20, 2010

I Dream of New Kitchens

When Husband and I went house shopping his main requirement was a kitchen in which he could take a step because that wasn't happening in our rental's one butt galley kitchen. Not to mention that sad excuse for a kitchen was stuck smack in the middle of 1976. Ew.

The kitchen in our condo is the largest room in the house.


It's your basic boring builder's kitchen but at least it's ours!

Sunday, April 11, 2010

Telephone Book Wreath

I have a bunch of telephone books lying around the house. I don’t know how this happens - we don’t have a land line! We’re a cell phone as home phone family.

I figure I could do one of two things with those phone books.

  1. Complain about them – which isn’t very productive and not really worth the energy.
  2. Find a way to use them - beyond the obvious because that's why Al Gore invented Internet - so we could use it to look up telephone numbers :)
I wanted a new wreath for the door to celebrate spring. I had a wreath form from a failed project. "What if I married my telephone books and my wreath form it would be the perfect project to enter in Dollar Store Crafts April Stash Bust Challenge?" says I. Not to mention it's an ultra cheap - and green! - way to get a new door decoration because I’m using what I already have on hand.

*Enter the Condo Blues Whammy*

I opened the wreath storage bag and found this.


Once upon a time this was all in one piece.


Nuts.

Looks like I lost of the Stash Bust Challenge even before I started. *Sad face*

I decided to try to piece the form back together. If I got something workable I’d move on from there. If not, I’d ditch it and hop on down to the store and buy a new wreath form.

I removed the Christmas balls with a pair of needle nose pliers and put them aside for another day.

Can this wreath be saved?

I snapped the tops off of some plastic forks that have been wallowing in the utility closet so long they are practically family heirlooms. I used them as supports to hot glue the form back together.

Trash or treasure to be?

I cut a piece of leftover cardboard from I don’t-know-what to the size of the frame to stabilize it. I attached the cardboard to the chewed up side of the Styrofoam with hot glue and floral tape. I think the floral tape might be from when I did the flowers for Christina from A Mommy’s Story’s wedding. I hot glued the floral tape into place because it wasn’t sticky anymore. I also made a note to use more of this stuff up because the floral tape has to be a least 6 years old – older than Christina’s kids.


I ripped the white pages from the telephone book into approximately one inch strips. I used the business white pages because I wanted black and white paper. I tried to rip down the telephone number columns of the page for privacy’s sake.

 I shredded the leftover paper scraps and put them in my compost bin.

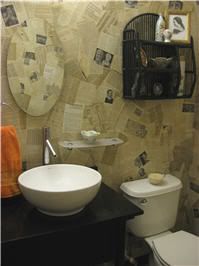
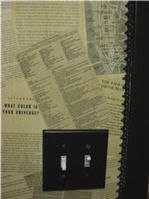
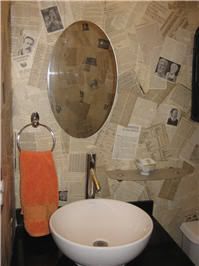
I used by very good friend Modge Podge to attach the paper strips to the wreath form and let it dry over night. The Modge Podge will also protect the paper from the elements. The Modge Podge is leftover from my books as wallpaper bathroom remodel. Is it just me or is this post playing out like an episode of Horders? Yipe!


Modge Podge rules!

I painted an empty toilet paper tube orange as an homage to How about orange… and let it dry overnight too.

Orange you going to say it's pretty?

The next morning, I smashed the toilet paper roll tube flat and cut it with scissors.

 I eyeballed the cuts 'cuz I'm a rebel.

I hot glued the leaf shaped rings to the wreath form and added some scrap ribbon to the back as a hanger upper thingie.

The finished wreath!

TA DA! My telephone book and paper tube wreath idea actually worked! Yay me!


Did you enjoy this post? Get more like it by subscribing to the Condo Blues RSS Feed or to Condo Blues by Email.

Visit thecsiproject.com


Monday, March 29, 2010

Modern with a Vintage Touch Bathroom Remodel

My half bathroom was white, builder bland and boring. I wanted to do something old timey to honor the porcelain pieces that my Grandmother painted and a place put some old family photographs but with a bit of a modern twist because I'm not completely an old fashioned girl. The trapeze mirror, shelf, toilet paper holder, and towel ring are all Umbra that I got on sale and each a different store. It’s like the universe wanted this bathroom design to come together!

My pretty privvy

The inspiration for the wallpaper came from a stack of books I was going to donate to charity. I flipped through the yellowed pages of a paperback reference book and thought it would be a great wall color. Being that the book was out of date, I doubted it would actually sell at the bookstore and thought, "Hey, why don't I use it as wallpaper instead?"

Even on bad hair days, I get a thumbs up whenever I look into the mirror

I went to the thrift store to get more books to use as wallpaper. I didn't want a story, just random interesting pages. I used watered down white glue as a DIY Modge Podge to paste the book pages to the wall. I used a combination of orphaned encyclopedia volume, a New York city travel guide, 2 almanacs (one from the year we were married, the other from the year we bought the house), a Portuguese soccer book, and a movie listings book, among others. After pasting the pages to the walls, I tea stained them with old tea bags and coffee grounds to age the pages from the newer books. A coat of clear glaze protects everything from moisture. It cost a grand total of $20 to do the walls because I had a gallon of white glue and glaze left over from another project.

Black fabric trim adds a little interest to the trimwork and might hide a few paint mishaps

The shelving is a wicker shelf from my old house painted black. The wall switches are the original white ones that came with the house and repainted black as well as the base boards. I got a deal on the paint because the can was dented and the put it on clearance.

I installed this myself! Black cording is used as molding where the wall meets the ceiling

There are CFLs in the new light fixture I installed. Husband admired a similar one in another store so when this little beauty was on sale at HomeGoods I snatched it up and installed it.

My first plumbing project!

I replaced the boring builder's sink and vanity with a vessel sink and black granite topped vanity. I did all of the work myself - this was my first plumbing project ever! I use a porcelain bowl my Grandmother painted as a soap dish. It holds a bar of homemade soap I bought at a craft show.

Stylish storage

All of my cleaning supplies are discretely tucked away in a trunk that held TV promotion information for a syndicated TV show. I got it when I worked in the promotion department of a local television station.

Method featured my bathroom on their blog and said “Lisa's a 2010 gal with a 1950’s soul.” I suppose it’s true. How did they know I’m pining for the next season of Mad Men to start?


Did you enjoy this post? Get more like it by subscribing to the Condo Blues RSS Feed  or to Condo Blues by Email.

This is an entry for PartSelect’s $5000 GE Giveaway contest

Visit thecsiproject.com