
But at least I got the name of this blog out of the deal. So there’s that.

We were so sad when the harsh winter killed our lavender bushes.We spent many cool summer evenings chilling on the porch and watching the biggest bees you’ve ever seen flit and play amongst the flowers. The on demand organic lavender is something I miss too.
We tilled the soil in the front flower beds and planted lavender instead of traditional evergreen bushes. Next I turned my attention to the crumbling brick garden border.
Why Your Dry Stack Brick or Stone Garden Border is Falling Over and How to Fix It
The reason why my dry stack vintage brick garden boarder is simple. I built it quick. I didn’t build it right. I also built the garden border too high.
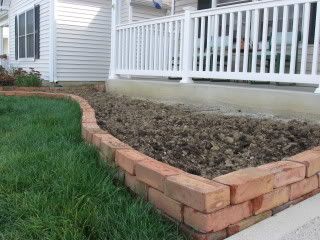
I made the original brick garden wall 3 three bricks high. It would have worked better if I filled the garden bed with more soil. Live and learn!
It was easy to remove the brick border because I didn’t mortar them into place. That way it won’t damage the lawn service’s mowers and equipment then they run into and over my garden borders. It happens more often than I like.
You will need:
Shovel
Leveling sand – mistake #1 was not using leveling sand the first time
Paver lock sand – mistake #2. This is a polymeric sand that acts like glue after you wet it.
Tamper – you can rent these or check one out at your local tool lending library for free!
Wood stakes
Twine
Level
Tape measure or ruler
Paint brush
Water
Do it:
1. Dig a shallow trench in the dirt with the shovel where you want your garden border. I completed this step the first time around. All I had to do is unstack the current border and clean it up a bit.

All in all you're just another brick in the wall.

Take the extra time to do Step 2. It will make your job easier later on.
3. Place a shovelful of leveling sand in the trench. Not doing this was my first mistake. The leveling sand will help you when it is time to jiggle the brick or stone a bit to make it level when you are building your border. it will also allow the finished stone or brick border to shift as the ground freezes and thaws in cold weather.

Leveling sand is your friend!
4. Tamp the sand smooth with the tamper.
5. Place the first row of bricks or stone in the trench according to your guide rope and double check each brick or stone with the level. You made need to wiggle the stone or brick a bit or add or remove a bit of sand underneath the brick if you need to adjust the height and/or make it level.

Bricklaying!
6. My vintage bricks are uneven with age and not flat. I added a layer of leveling sand to the top of the first layer of bricks. I also added handfuls of paver lock sand for good measure since my bricks are not perfectly flat. You may not have to add the paver lock sand if you are working with identical pavers.
7. Place and offset the second row of bricks on top of the first checking that each brick is level and at an even height to your twine guide.

I use a half of brick on the ends to keep the wall nice and flush.
8. Brush paver lock sand onto and into where each brick or stone meets with the paint brush. Make sure you fill each crack/seam with as much sand as possible because this is the “glue” that will hold your border together and keep it from eventually flopping over.

Don't use your good paint brush for this project because you may not be able to wash all of the sand out of it. I bought a three dollar chip brush for this project. It worked fine.
9. Water the seams of the garden border to activate the paver lock sand. You don’t need to completely soak it with the garden hose. Wetting the sand so it is thoroughly damp is fine.
10. Stand back and admire your work!

Brick garden wall After.
If your brick garden border cannot be repaired, consider installing or incorportatig one of the following brick garden borders below!
Did you enjoy this post? Get more like it by subscribing to the Condo Blues RSS Feed or to Condo Blues by Email.
No comments:
Post a Comment
I love comments and read them all! If you’re shy and don’t want your opinions made public, you can always email me at condoblues [at] gmail [dot] com.