
Which is perfectly fine because this year I’m decorating my house with a life size live action Santa Claus and I’m repurposing my Halloween decorations to do it. It will be SO! FREAKING! COOL!

Last Halloween we haunted the windows of our house with animated ghosts - just like the kind you see in a haunted house or on the dance floor of The Haunted Mason! (my favorite part of the ride, by the way.) We were the talk of the neighborhood (in a good way.)

Dancing skeletons!
I still have my review copy of the AtmosFX Digital Decorating Kit AtmosFX provided me for my Halloween Digital Decorating post. My original plan was to decorate with the Christmas movie clips that come on the SD animation card that is included with the LED projector, tripod and rear projection screen in the Digital Decoration Kit. Totally easy because I’m a little ashamed to admit I still have everything set up among the craftermath of my studio since October.

Elfing around Santa's Workshop!
Later, AtmosFX asked me if I wanted to give some of their new Christmas and New Year’s Eve rear projection a whirl. AtmosFX is constantly making and releasing new animations. The founders were MTV animators, you could say we had Beavis and Butthead haunting our house for Halloween. Well, they might as well stay for Christmas. Heh, heh, heh.
How to Make Projection Animated Christmas Decorations
I opted to try the Winter Wonderland and Celebration animation collections via digital download. From there it is up to you to decide which playback medium you want to save it to; SD card, USB drive, DVD, a spare computer, etc. A little head’s up: the files are huge and wouldn’t fit on my spare 1GB USB drive (probably empty because it is only 1GB.) I bought a bigger thumb drive so I can keep it and any future downloads in one place.
The Winter Wonderland are a series of snow scenes. Tranquil and peaceful
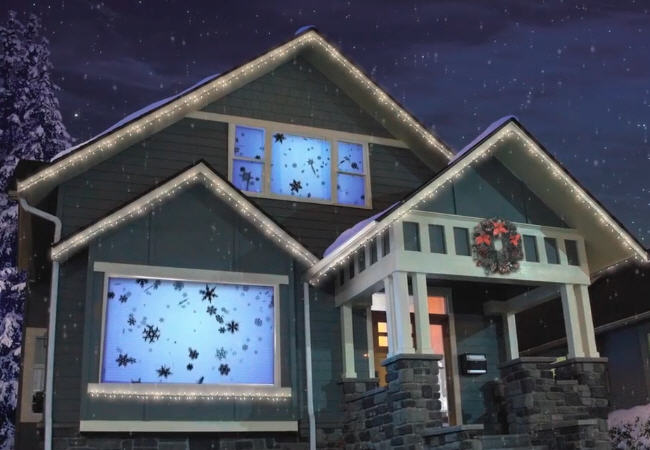
My plan is to set up the Christmas animations that come with the Digital Decoration kit as rear projection window decorations until Christmas and switch to running Celebrations on the TV for New Year’s Eve and switch to projecting Winter Wonderland on a wall so it looks like it is snowing inside my house!

Yep, you can also play the Digital Decorating animation on a TV, computer monitor, or project them on a wall, floor, or ceiling if you don’t want to project them out of a door or window.
How to Set Up Christmas Projection Decorations Outside
A nylon projection screen (AtmosFX provides one in the Digital Decorations Kit) or thin cotton cloth
AtmosFX Hollusion Projection Material – This is a special projection fabric that disappears in the backgroud when you rear project a Hollusion animation on it. The set up is the same as the nylon projection screen but the results are visually astounding!

Hollusion Santa says, "Ho ho ho!"
The AtmosFX Digital Decorating animation of your choice
An LED projector (AtmosFX provides one in the Digital Decorations Kit if you don’t already have one)
The playback device of your choice: SD card, USB drive, computer, HD equipment, etc.
A window or door in a very dark room - The AtmosFX projection decorations works best in a
room or aarea that is completely dark.
I’m always thinking about caring friends like you - that's why I share ideas like these. When you get a goodie thought some of the links in this post, I might get a few coins thrown my way that keeps me supplied with enough coffee and household electricity to keep bringing you free DIY ideas like this one every week. Thanks for helping me keeping the lights on!
1. Hang the nylon or Hollusions projection screen so it is covers the window or doorway. The fabric should be taut.
If you are using the Hollusions fabric, you can hang the fabric from your porch (there are grommets on it) or make a frame for your yard so it looks like the Hollusion style animations are frolicking in your yard!
I am using clothes pins to clip the nylon projection screen to the bottom of an open window blind instead of the hook and loop tae that comes in the kit.
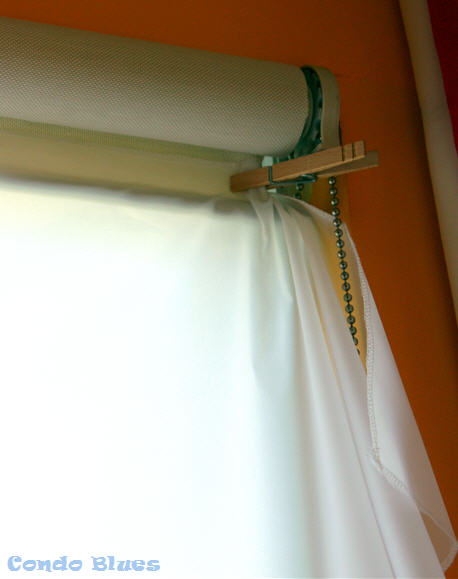
I have the option of projecting through the solar roller blinds I already have on my house (same goes if you have sheer curtains) but I wanted to test all of the items that can in the kit for you.
2. Turn on and point the projector behind the screen. You may need to use the small tripod that comes in the kit or you can use a larger camera tripod like mine if you need something taller. AtmosFX supplies you with both vertical and horizontal animation loops. I put my projector vertically on my camera tripod since I will be projecting out of a single vertical window from the center of the room.
3. Attach the playback medium/device to your projector, if needed. That is already included in the AtmosFX projector that comes in the Kit.
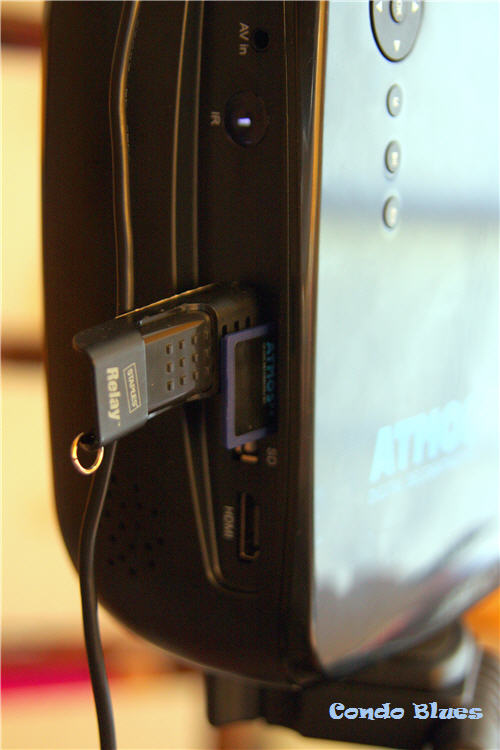
I will be playing animations from both the USB drive and the SD card that came in the kit. Yep, you can jump from one video source to the another and back again. Sweeeeeeeeeeeeet!
4. Use the projector’s remote control to open the AtmosFX animation folder of your choice. Use the focusing ring on the projector as needed. 5. Use the arrow buttons on the remote control to scroll to the animation files you want to play and press the OK button to select them. Once you have selected all of the files you want to run, press the Play button.
You can use the menu button to access menus that allow you so future customize the sound, put the projector on a timer, etc. I took a photo of one of the access menus projected on a wall so you can see it better.

Tip: The remote to the AtmostFX projector doesn’t have a wide inferred beam like my TV remote. I found it worked best if I pointed the remote directly to the back of the AtmostFX projector. Don’t lose the remote! It is the only way you can play the projection animation decorations.
6. Turn the off the lights to the room and let it snow!
Did you enjoy this post? Get more like it by subscribing to the Condo Blues RSS Feed or to Condo Blues by Email.
1 comment:
I love comments too!
Post a Comment
I love comments and read them all! If you’re shy and don’t want your opinions made public, you can always email me at condoblues [at] gmail [dot] com.