
A new friend used the word magical over and over to describe her foster children’s visit, how they carried the treasures our performers gave them like gold that day, and even now these trinkets are very special for her children. Learning that her kids marveled at meeting so many "famous people" (what her kids call costumed characters) made my heart flutter and knocking myself out performing, especially on the tough weather days worth it even more.
Last year I made lady bug favors from bottle caps. I was surprised at my own reaction to every single child and adult who politely accepted my bottle cap ladybug only to get excited and surprised once they turn it over to see the little craft gem I glued underneath as craft supply stash bust project.

Pin this recycled craft tutorial to your Pinterest boards for later! Share this idea with your friends!
Who knew a silly plastic gem could spark so much joy?
DIY Bottle Cap Children’s Party Favor Craft
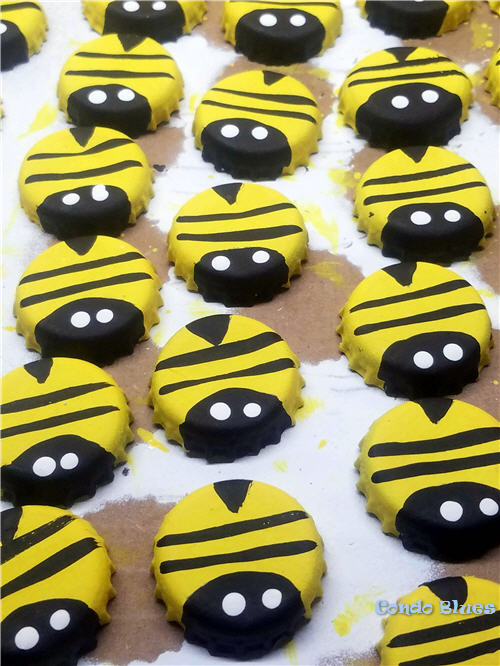
This year, I keeping with the bottle cap favor stash bust craft theme and making honey bees from bottle caps. They are very easy to make for children or better yet you can make them with children!
Metal bottle caps – if you haven’t saved bottle caps for several years for a flooring project you decided you didn’t want to do, you can skip several painting steps and buy yellow metal bottle caps here
Spray paint primer – Do NOT skip this step especially if you are working with dark colored or printed bottle caps
Yellow multisurface craft paint
Black multisurface craft paint
White multisurface craft paint
Mod Podge
Gem Tack
Scrapbook paper or printed bottle cap art
1 inch circle paper punch
Heart shape paper punch
Plastic gems like these
Paintbrush
Quarter
Pencil
Straight pin
Scissors
(Disclosure: I am including big bold affiliate links for the items I used in this post for your convenience)
1. Prime the metal bottle caps with a coat of spray primer so the paint will not scratch off the metal bottle cap. I used Zinsser spray primer (learn more about it here.)
2. Paint the yellow background color of your bottle caps. I used four coats of yellow craft paint to make my honey bees. If you are doing this for a children’s craft class, I suggest doing this step for the kids before class (yellow spray paint for metal with primer like this one will speed the base coat process up by a lot) or buy yellow bottle caps for crafts here.
3. Trace a half circle onto the bottle cap using the quarter as a guide with a pencil to make the outline for the head and draw a little triangle on the opposite side of the bottle cap to make the stinger.
4. Use a paint brush and black craft paint to fill in the outline for the head and stinger tail.
5. Use the paint brush and back craft paint to add strips to honey bee’s body.
6. Put a straight pin in the eraser end of a pencil to make a dotting tool. Use the dotting tool and white craft paint to add two white dots to make the eyes on the bee’s head. If you are doing this craft with young children, you can also use the end of a small paint brush for your eye dotting tool.
Buzz! Buzz!
7. After the paint is dry on the bee’s body, use the one inch paper punch to punch circle from pretty scrapbooking paper or art and glue it to the inside of the bottle cap with the Mod Podge and use the Gem Tack to glue a gem in the center of the paper.

I used the Arvey site to print my clip art flower on their template
for 1 inch round stickers. I printed it on printer paper and cut them out with my 1 inch round paper punch.
If you want to make your bee into a magnet you can glue one of these 1 inch round magnets to the back of the bee instead or leave it blank. I like to at least glue scrap book paper to the back of my bottle cap projects to cover up the inevitable finger prints from handing wet paint.
8. It is time to make this wee bumble bee some wings! Punch a heart shape from white scrapbook paper, fold the heart shape in half, and use the scissors to cut the heart shape in half. Unfold the wings and use Gem Tack to glue the wings to the bumble bee’s back

Paper punches give you wiiiiings!
9. After the bottle cap bee has thoroughly dried, cover it either in a coat of Mod Podge with a paint brush or Mod Podge Spray Sealer (learn more about it here) to keep the paint from future flaking and chipping if desired.
If you'd rather buy than DIY bee theme party favors, check the following ideas - and more! - below!
Did you enjoy this post? Get more like it by subscribing to the Condo Blues RSS Feed or to Condo Blues by Email.
2 comments:
Oh, this is the cutest thing ever! Thank you for sharing at The Really Crafty Link Party. Pinned.
These are so stinkin cute! Thanks for sharing it with us at Creatively Crafty Link Party. #CCBG
Post a Comment
I love comments and read them all! If you’re shy and don’t want your opinions made public, you can always email me at condoblues [at] gmail [dot] com.