Six years ago I made a set of aluminum can coasters that looked like this:

After years of abuse with a constant stream of hot coffee cups and cold beverages all day every day the coasters on our desks now look like this:
Choosing a difference adhesive may have helped as well as adding a protective coating to the top. Cutting down on coffee and ice water is not going to happen - ever.
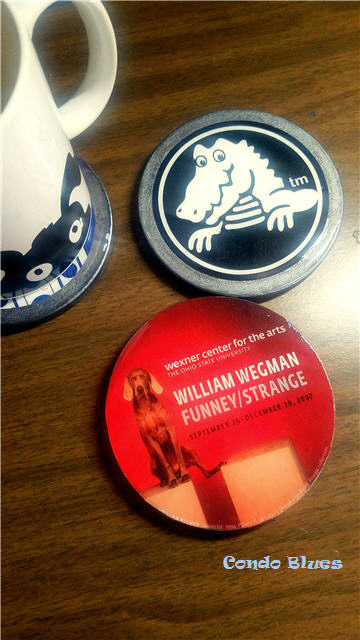
The ceramic coaster itself is still useful. It’s only the top that isn’t pretty anymore. It is an easy makeover. I was waiting for some flash of creative inspiration that never came. I came across a bunch of stickers I collected (AKA stuck in my paper craft drawer and forgot about until a recent reorganization) from places we’ve gone and such. I needed to stop overthinking the project (especially when it will be covered up by a cup or sports bottle) and used the stickers as artwork. I’d much rather have a reminder of visiting the William Wegman art exhibit with glimpses of it on my desk rather than forgotten in a drawer.
Save this DIY coaster idea to your Pinterest Boards for later! Share it with your friends!
How to Make Ceramic Coasters the Easy Way!
Now that I had the design and adhesive thing figured out (stickers) I needed a durable top coat for my coasters. Resin is all the rage for its tough, glossy finish with good reason. But you have to mix it before using it and it is chock full of toxic chemicals that I’d rather not use even with safety equipment inside the house.
That’s why I decided to go with Dimensional Magic. Dimensional Magic gives your project a 3D and glossy epoxy like finish but is water based for easy soap and water clean up. Dimensional Magic is non toxic so it doesn’t require safety equipment (a mask and gloves.) Dimensional Magic isn’t as durable as resin, especially when it comes to heat, but it’s also what I have on hand so I’m using it. If worse comes to worse, in six years I redo the project with resin or whatever craft material strikes my fancy.
I discovered that Mod Podge is makes a real deal 2 part resin you can learn more about here while I was writing this tutorial. If I ever get the inkling to try a DIY resin project I’ll probably check it out because Mod Podge projects have never failed me . (Disclosure: I am including affiliate links in this post for your convenience.)
Let’s make some ceramic coasters!
You will need:
Coasters – I am using round ceramic coaster blanks similar to these but you can use round wood blanks, square tiles, or whatever you like
Stickers – you can also use craft paper, maps, napkins, or any other image you like. Be creative! Go nuts!
Mod Podge Dimensional Magic – you can buy Dimensional Magic here
Mod Podge Hard Coat – you can buy Mod Podge Hard Coat here
Pin
Paint Brush
Multi surface craft paint – optional
Sandpaper – optional
Paint scraper – optional
Step by Step How to Make it Tutorial
Since you are probably making your coasters from scratch, you probably won’t have to remove the old artwork from your coasters with your hands or remove any leftover adhesive with a paint scraper and sandpaper like I did.
1. Paint the coasters with multi surface craft paint if desired. Make sure the paint you use is made for your surface. I ended up using the only paint in my work room that isn’t a multi surface craft paint, didn’t use gesso (learn more about gesso craft paint primer here) before changing it from a dark color to a lighter one, and had a bleed through on some of my coasters when the Dimensional Magic dried.
I’m still using the coaster because the sticker is from when I was a guest performer at a local improv comedy show. Yep! Sometimes people pay me to do comedy.
2. Put your artwork on the top of each coaster. Because I am using stickers, my adhesive is decided for me. If you aren’t using stickers, apply Mod Podge Hard Coat to the back of the image and to the coaster surface with a paint brush and glue it to the coaster. Allow the Mod Podge to dry before moving on to Step 3.
3. Use the paint brush to seal the top of the artwork with the Mod Podge Hard Coat and allow it to dry.
4. Working from the outside of the coaster to the center, flood the top of the coaster with Dimensional Magic. If you haven’t worked with Dimensional Magic before, here are a few tips:
- It helps if you work on a raised flat surface. I used an empty baby food jar as a riser.
- Don’t panic if you get bubbles in your application. Simply pop the bubbles with a pin while the Dimensional Magic is still wet and before it dries.
- If you have a little dip or area you missed covering after the Dimensional Magic dried, you can fill the area in with more Dimensional Magic. It will dry clear and no one will ever know!
5. After the Dimensional Magic is fully dried (it usually takes 24 hours but it was humid when I did my project and took a little longer to dry,) drink up, and now you a place to put your cup!
If you’d rather buy than DIY, check out the following coaster options, and more! Below!
Did you enjoy this post? Get more like it by subscribing to the Condo Blues RSS Feed or to Condo Blues by Email.


No comments:
Post a Comment
I love comments and read them all! If you’re shy and don’t want your opinions made public, you can always email me at condoblues [at] gmail [dot] com.