
 This year Husband and I decided to go with fall decorations
for the porch and yard instead of our traditional sea dog cemetery since our one
eyed pirate dog is not here to captain the ship.
This year Husband and I decided to go with fall decorations
for the porch and yard instead of our traditional sea dog cemetery since our one
eyed pirate dog is not here to captain the ship.
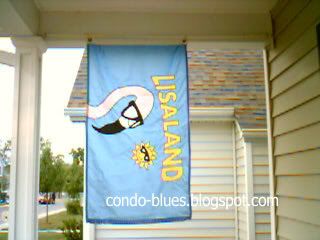
I’m starting with our garden house flag. The LisaLand flag
(an inside joke that Husband had made into my birthday present) is summery and
a tad worn. Normally I replace it with a pirate flag I put up for InternationalTalk Like a Pirate Day (yarr!) and leave up until after Halloween. Yo ho ho and
a bottle of chardonnay! (That’s what girlie pirates drink.)
I poked around a few stores for personalized house flags and
the luck of being me, the house flags I like did not have a W. Who knew our
initial was so popular?
When I can’t buy, I’ll DIY!
And with a renewed goal of using what I have on hand first
(for saving the moneyz and clearing crap precious treasures I keep to
repurpose from my house) I decided to decorate with drop cloth bits I had left
over from making my LOL Cats drop cloth grill cover.
How to Make a House and Garden Flag from a Drop Cloth

You will need:
19 inch wide by 26 inch long rectangle of drop cloth
Coordinating fabric for the edging and letter
26 inches long by 4 inches piece of interfacing (I used a
piece I cut from a recycled plastic reusable shopping bag.
Rule
Paper
Pencil
Scissors
Pins
Thread
Sewing machine
Fabric paint
Trim
Iron
Ironing board
1. Use the ruler and scissors to
measure and cut 2 pieces of the coordinating fabric 33 inches long and 8 inches
wide for the sides of the flag, 1 piece 26 inches long and 8 inches wide for
the top of the flag and 1 piece 14 inches long and 26 inches wide for the
bottom of the flag.

3. Pin the paper pattern to the coordinating fabric and cut two initials from the coordinating fabric with the scissors.


6. Pin the fabric trim to both sides of the drop cloth and use the sewing machine and thread to sew them into place. Tip: Remove the pins before you sew over each pin with the sewing machine needle. It reduces the chance of sewing a small wrinkle into your project and possibly breaking your sewing machine needle if it hits a pin. Guess how I know about that?


Snip! Snip!
2. Use the paper and pencil to
create a pattern for your initial and cut the pattern out with the scissors.
3. Pin the paper pattern to the coordinating fabric and cut two initials from the coordinating fabric with the scissors.
4. Turn approximately one inch of
the fabric in toward the wrong side (not pretty side) of the fabric and press
into place with the iron and ironing board. Do this for all four sides of each
fabric strip. This will give you a nice finished edge when you attach the trim
to drop cloth.
5. Fold each trim piece in half and
press into place with the iron and ironing board. Congratulations! You made the
fabric trim for all four sides of your flag.
Pin time!
6. Pin the fabric trim to both sides of the drop cloth and use the sewing machine and thread to sew them into place. Tip: Remove the pins before you sew over each pin with the sewing machine needle. It reduces the chance of sewing a small wrinkle into your project and possibly breaking your sewing machine needle if it hits a pin. Guess how I know about that?
7. Pin the folded 14 inches by 26 inches
trim piece to the bottom of the drop cloth. Use the sewing machine and thread
to sew it into place.
8. Pin the folded 26 inches long
and 8 inches wide trim piece with the piece of interfacing in the center to the
top of the flag. The interfacing will help keep the top of the flag stiff and
durable in the wind. Use the sewing machine to sew the trim into place. Leave
the sides of the top trim piece unsewn so you can run the flagpole through this
pocket to hang your house flag.

I knew that extra shopping tote stash would come in handy!
9. The fabric I used (left over
from a skirt project) frayed easily. I ran a bit of Fray Check around the edges
of both Ws to keep them from fraying.
Fray Check is a costumers’ best friend.
10.Use the fabric glue or Wonder Under and an iron to attach the initial
to both sides of the drop cloth house flag.
Fabric glue is a costumer’s second best friend
11. Use the fabric glue to Wonder Under to attach the trim
to both sides of the drop cloth house flag.


Wonder Under is a costumer's third best friend especially when doing appliques
12. Outline the initial with black fabric paint.
13. Attach your house flag to a flagpole and fly it proudly!
Did you enjoy this post? Get more like it by subscribing to the Condo Blues RSS Feed or to Condo Blues by Email.
Featured on

7 comments :
Nice banner! I like seeing what you make out of "precious treasures I keep to repurpose from my house". Also, LisaLand sounds like a fun place to visit ;)
I really like this! bookmarking!
I just really love your flag. It's not only attractive but also unique. I like the clean look. I can do this. (I'm pretty sure. I love to sew and I love to glue also. I use Fabri-tac glue which is great. Thanks for the tute. Linda
This is fantastic!! Thanks so much for sharing! Can't wait to try this!
Found you through the linkup! Would love for you to see the wreath I posted!
xo
SEL
growinglaughingandlovinginlife.blogspot.com
It turned out beautiful!!! I want one!
Thanks so much for sharing this at The DIY Dreamer.. From Dream To Reality!
Thanks for linking up to last week's Tuesday Confessional! You've been featured and Pinned so head over and grab a brag button!
http://www.craftyconfessions.com/2012/09/tuesday-confessional-features_23.html
~Macy
Love your flag! It turned out just great!
Post a Comment
I love comments and read them all! If you’re shy and don’t want your opinions made public, you can always email me at condoblues [at] gmail [dot] com.