
Our favorite Halloween decorations are the kind that move. Unfortunately condo living means we don’t have the storage space for moving inflatables or the life size animatronic ghosts we see when we idea shop at the Halloween store. Bummer, I know.
We generally keep things fresh by mixing and matching the decorations we already have sprinkled and I add a healthy dollop of DIY props if we want to decorate with a new outdoor Halloween theme.
This year my husband and I are going BIG with our DIY Halloween decorations and haunting the windows of our house with animated ghosts - just like the kind you see in a haunted house or on the dance floor of The Haunted Mason! (my favorite part of the ride, by the way) using AtmosFX Digital Decorations who provided samples for this tutorial. That’s right, friends we are using projection Halloween decorations this year and they look so. freaking. cool!

Pin this easy Halloween decorating idea to your Pinterest boards for later! Share it with your friends!
How to Project Animated Halloween Ghost Decorations
I though I’d have to turn this review opportunity down because I don’t have an LED digital projector until AtmosFX said could provide me with a AtmosFX Digital Decorating Kit that has everything I need to haunt my own house: an LED projector, a rear view projection screen, and an SD card with a sample of their more popular Halloween projection movie clips. Update: 10/1/2020: The AtmosFX projector kit I have is unavailable but this HomeFX Projector Decoration Kit is similar and comes with everything I got with my sample except with different video decoration files. It seems that AtmosFX is concentrating more on creating new holiday decorating videos than equipment. You can buy AtmosFX digital decoration animation files here. (Disclosure: I am including affiliate links in this post for your convenience.)If the built in animations don’t strike your fancy AtmosFX is constantly making and releasing new animations. The founders were MTV animators, so you could say Beavis and Butthead are creeping round our house this Halloween – shudder!

I also opted to try the Paranormal Passage collection via digital download. (Actually I wanted to try the family friendly title Boo Crew but I was outvoted by the family decorating committee.)
From there it is up to you to decide which playback medium you want to save it to; SD card, USB drive, DVD, a spare computer, etc. A little head’s up: the files are huge and wouldn’t fit on my spare 1GB USB drive. I rooted around and found a 4GB drive that was large enough.
You will need for each window:
Video window projection screen like this one
The dancing skeletons are my favorite
I also opted to try the Paranormal Passage collection via digital download. (Actually I wanted to try the family friendly title Boo Crew but I was outvoted by the family decorating committee.)
From there it is up to you to decide which playback medium you want to save it to; SD card, USB drive, DVD, a spare computer, etc. A little head’s up: the files are huge and wouldn’t fit on my spare 1GB USB drive. I rooted around and found a 4GB drive that was large enough.
How to Set Up Halloween Projection Decorations Outside
Video window projection screen like this one
The animation file or dvd of your choice - You can find all sorts of spooky, scary, and family friendly Halloween projection decoration animation files here
The playback device of your choice: SD card, USB drive, computer, HD equipment, etc.
A window in a very dark room - The AtmosFX projection decorations works best in a room that is completely dark.
1. Hang the nylon projection screen so it is covers the window (s. ) I use clothes pins to clip the screen to the bottom of an open window blind instead of the hook and loop tape that comes in the kit.
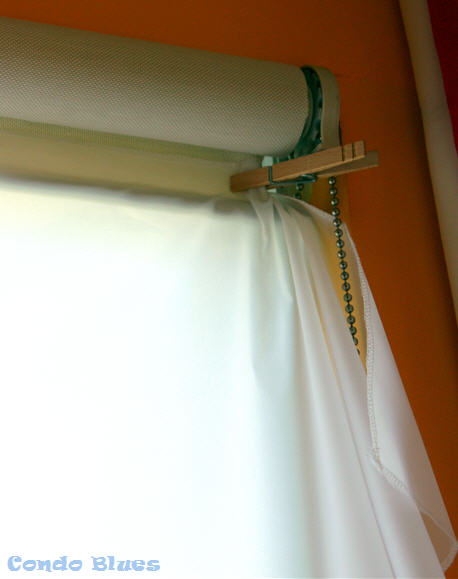
I have the option of projecting through the solar roller blinds I already have on my house (same goes if you have sheer curtains) but I wanted to test all of the items that can in the kit for you.
2. Turn on and point the projector at the screen. You may need to use the small tripod that comes in the kit or you can use a camera tripod if you need something taller. AtmosFX supplies you with both vertical and horizontal animation loops.I put my projector vertically on my camera tripod since I will be projecting out of a single vertical window from the center of the room.
3. Attach the playback medium/device to your projector.
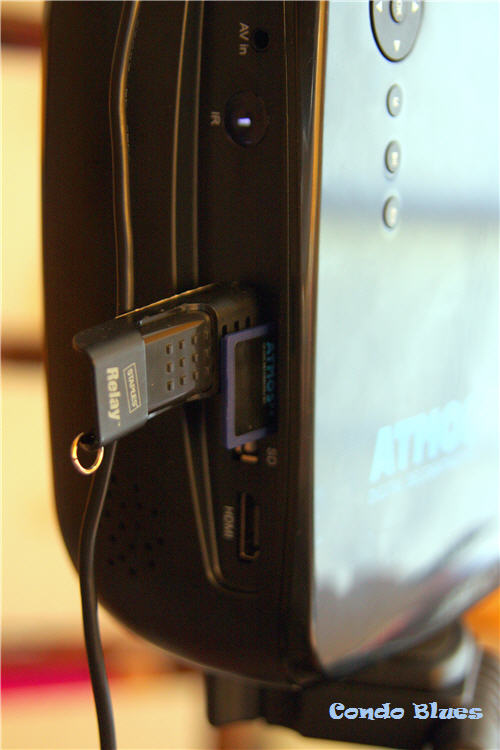
I will be playing animations from both the USB drive and the SD card that came in the kit. Yep, you can jump from one video source to the another and back again. Sweeeeeeeeeeeeet!
4. Use the projector’s remote control to open the AtmosFX animation folder of your choice. Use the focusing ring on the projector as needed. 5. Use the arrow buttons on the remote control to scroll to the animation files you want to play and press the OK button to select them. Once you have selected all of the files you want to run, press the Play button.
You can use the menu button to access menus that allow you so future customize the sound, put the projector on a timer, etc. I took a photo of one of the access menus projected on a wall so you can see it better.

Tip: The remote to the AtmostFX projector doesn’t have a wide inferred beam like my TV remote. I found it worked best if I pointed the remote directly to the back of the AtmostFX projector. Don’t lose the remote! It is the only way you can play the projection animation decorations.
6. Turn the off the lights to the room and let the haunt begin!
Even better is that projection Halloween decorations are customizable and super versatile. You can project them on a wall, the floor, on objects like pumpkins to make them “talk”, or even in a doorway or window and it took about 15 minutes to have it set up and running. If I don’t decorate with anything else except the AtmosFX Digital Decorations kit I having running, I have still knocked it out of the park as far as my neighbors are concerned this year.
My husband and I are already planning (more like scheming) what we can do with Digital Decorations to decorate for Halloween next year!
Looking for more Halloween video decorating ideas? Check out the following options - and more! - below!
Did you enjoy this post? Get more like it by subscribing to the Condo Blues RSS Feed or to Condo Blues by Email.
6 comments :
These are great, I'm going to make a few #alittlebitofeverything,@_karendennis
wow, I'll bet your condo is really cool to see!
These look awesome!Thanks for sharing!
I love this idea, Lisa! Found you on Crafty Creators Link Party - Life as a Leo Wife.
These look so cool! I bet everyone loved being entertained by your decorations all season! Thanks for sharing on Crafty Creators!
Boo! Love it, looks great!!
Post a Comment
I love comments and read them all! If you’re shy and don’t want your opinions made public, you can always email me at condoblues [at] gmail [dot] com.