The KOR ONE is a one of the few water bottles I have that I can but in the dishwasher. Given the rounded bottom, the bottle is surprisingly sturdy and doesn’t tip over easily. And just for fun, the KOR ONE features a “stone” cap insert with inspirational sayings such as “Never Settle” or “Laugh Often.” They also include a blank stone so you can create your own message. I got all Alice in Wonderland and made a “Drink Me” stone for my - oh, geez, I’ll just say it - my Hydration Vessel’s lid.
Monday, November 24, 2008
The KOR ONE: Reusable Water Bottle or Swanky Hydration Vessel?
KOR set out to redesign the reusable water bottle and make it appealing to the nonsporty crowd because let’s face it most of the reusable water bottles out there are designed for the sporty folks. KOR managed to combine my teenage love of fashion with my adult love of product designs (seriously folks, I’ve geeked out over the posh design of an orange juice squeezer) and put it into one gorgeous looking water bottle. Wow. (OK. OK. They call it a Hydration Vessel when really it’s a reusable water bottle - but who am I to quibble with marketing semantics?) Imagine my delight when KOR sent me one of their BPA-free plastic Hydration Vessels for review.
The KOR ONE is a one of the few water bottles I have that I can but in the dishwasher. Given the rounded bottom, the bottle is surprisingly sturdy and doesn’t tip over easily. And just for fun, the KOR ONE features a “stone” cap insert with inspirational sayings such as “Never Settle” or “Laugh Often.” They also include a blank stone so you can create your own message. I got all Alice in Wonderland and made a “Drink Me” stone for my - oh, geez, I’ll just say it - my Hydration Vessel’s lid.
Posted by
Lisa Nelsen-Woods
at
11/24/2008 07:00:00 AM
6
comments
Tags:
green
,
reuse/recycle
,
reviews
Friday, November 21, 2008
Have You Ever Put An Active Dog On Complete Bed Rest? It’s Not Easy…
cat ball muzzle on
makes dog look like Spaceman Spiff
all to check his back
Blitzkrieg is a very active little dog. And he’s smart. He knows tons of tricks sit, speak, down,
As of last Saturday, Blitzkrieg couldn’t hup.
Posted by
Lisa Nelsen-Woods
at
11/21/2008 07:23:00 PM
7
comments
Tags:
Blitzkrieg
,
dog sports
,
haiku friday
,
humor
,
life in general
,
Pekingese dog
Wednesday, November 19, 2008
Skil Power Cutter Review
It’s no secret that I love high quality power tools. I know the big names and as I’m slowly building the tool collection in my DIY workshop, I tend to check those out first. That’s why I was very excited that the fine folks at Skil sent me their new 
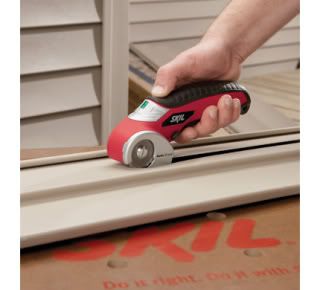
Skil Power Cutter for review because up until now, the only experience I’ve had with Skil brand power tools is drooling over their XBench Portable Workstation in the hardware store. Unfortunately, the Power Cutter is such a specific tool that I could only use for maybe one or two specific DIY or craft jobs around The Condo, that I can’t justify drooling over it. Maybe you might though.
The Power Cutter’s designed to cut material that is up to ¼” thick such as carpeting, vinyl flooring, wallpaper, heavy fabric like canvas, window screens, plastic pond liners, or items that are a little too thick to cut with regular scissors like cardboard, foam core board, or heavy cardstock. I tested the Power Cutter on cutting cardboard, paper, canvas, and a remnant of vinyl flooring the builder left at our house and that I will someday make into a floor cloth. I found that the Power Cutter works best on straight cuts; it didn’t do too well on detailed curvy cuts. The Power Cutter didn’t take very long to charge up and they say keeps it charge up to 18 months (which due to deadlines for this review I can’t test that, so I’ll have to take Skil’s word for it.) That’s impressive because there’s nothing I hate more than to grab a rechargeable tool from my toolbox for a quick DIY task and find that the battery’s dead.
Posted by
Lisa Nelsen-Woods
at
11/19/2008 07:00:00 AM
1
comments
Tags:
DIY
,
home improvement
,
reviews
,
tools
Monday, November 17, 2008
Three Easy, Natural, and Free Fall Centerpieces
Some people see raking autumn leaves as a chore. I look at it as an opportunity to redecorate my home with some unusual (and free!) natural fall elements.
My first centerpiece couldn’t be easier to make. I literally tossed a small collection of leaves, crabapples, seedpods, and a couple of buckeyes that I gathered from my yard and neighborhood park (always make sure that you have permission to take anything from property that isn’t yours first) around a paraffin free candle on an old tray.
Since I’m working with natural and dried elements near an open flame, you’ll notice that I have the candle in a protective glass holder so I don’t accidently set my centerpiece on fire. I also make sure that I do not leave burning candles unattended.
Posted by
Lisa Nelsen-Woods
at
11/17/2008 04:33:00 PM
8
comments
Tags:
craft
,
decorating
,
gardening
,
green
,
holiday
,
saving money
,
tutorial
Thursday, November 13, 2008
How to Winterize a Rain Barrel
If you live in an area that gets ice, snow, and/or freezing temperatures in winter, you should add one often overlooked task to your Fall Prepare for Winter Checklist: drain any standing water from your rain barrel.
During the winter, if the standing water you currently have in your rain barrel freezes, it could cause the rain barrel to crack or split, and well, then you’re out one rain barrel. Given the cost of those things, a rain barrel is not something that I personally would want to replace every spring or summer. Ouch.
Posted by
Lisa Nelsen-Woods
at
11/13/2008 07:00:00 AM
1
comments
Tags:
cleaning and organization
,
gardening
,
green
,
home improvement
,
How to
,
saving money
,
tutorial
Thursday, November 6, 2008
2 Rice Bags Turned into Shopping Tote Bags
Husband and I had some empty rice bags in our stash of reusable shopping tote bags. However, we rarely used them, or even worse, we got the passive aggressive stink eye from clerks at the grocery store because the rice bags were much smaller than the rest of our shopping tote bags.
I decided to make my small rice bags into larger shopping tote bags.
Shopping Tote Bag#1
I opened up the seams and removed the handles from this burlap rice bag with a seam ripper. Then I cut two 5 inch (3 inches wide + 1 inch seam allowances) rectangles out of a way too-faded-to-donate-to-charity 100% cotton curtain panel and sewed them to the sides of bag. I made and attached handles to the top of the bag for easy toting around town. I like how the green reclaimed curtain panel coordinates with the green lettering on the burlap rice bag.
The zipper is not functional. I just left it in the side of the bag so everyone knows that yes, this was once a small Basmati rice bag.
Posted by
Lisa Nelsen-Woods
at
11/06/2008 07:00:00 AM
19
comments
Tags:
craft
,
green
,
reuse/recycle
,
saving money
,
sewing
,
tutorial
Subscribe to:
Posts
(
Atom
)