Most car organizers I found are not made for sedans, only SUVs. Besides we don’t want a shopping bag and stuff organizer that doesn’t allow us to fold the back seat down. This is mostly an issue during the summer when I’m hauling color guard equipment back and forth to practice. The flags don’t fit in the trunk unless I fold the seat down.

Would you believe this is what my trunk looks like when it is neat? Sad. I know.
Dollar Store Cargo Net Car Organizer Tutorial
 I gave Lisa my idea to hang her shopping bag organizer on the side of the car trunk instead of the back. She came up with using laundry bags because the mesh is small enough to contain the most important thing in our car (besides snacks) my Frisbee and tennis ball for the dog park!
You will need:
Mesh laundry bag - This mesh laundry bag is similar to the one I used
Fabric - I used a
fat quarter of fabric
Interfacing
Scissors
Large grommet kit (I used this grommet kit from Dritz)
Iron and Ironing board
Thread
Straight pins
Sewing machine
Magnet hooks (I buy my magnetic hooks here)
Hook and loop tape
A canine project manger – Try to find one who doesn’t sleep on the job.

I am not sleeping on the job! My eyes are open!
Make it:
1. Remove the drawstring from the laundry bag. I cut the end off with a pair of scissors.
2. Use the scissors to cut a horizontal side open from the closed end of the bag to the open end of the bag.
3. Measure the circumference of the horizontal opening in the laundry bag and add 2 inches to that measurement for a seam allowance.
4. Use this measurement to measure and cut a piece of fabric and interfacing that is that long and 4 inches wide.
5. Fold the rough lengthwise edges of the fabric right side (the pretty part) to wrong side (the back of the fabric) in and iron them into place to make smooth edges to your banding.
6. Fold the banding wrong sides together and iron it into place. This will be the banding for the top of your cargo net trunk organizer.
7. Use the straight pins to pin the banding around the top of the open mesh bag. Use the sewing machine to sew the top and the bottom of the band into place.
 I used a zig zag stitch because I forgot to reset my sewing machine back to a straight stitch after a previous project and I figured why not? You can use a straight stitch too.
8. Pin the raw open end of the laundry bag closed. Use the sewing machine to sew the bag closed.

You should use a straight stitch to make this seam.
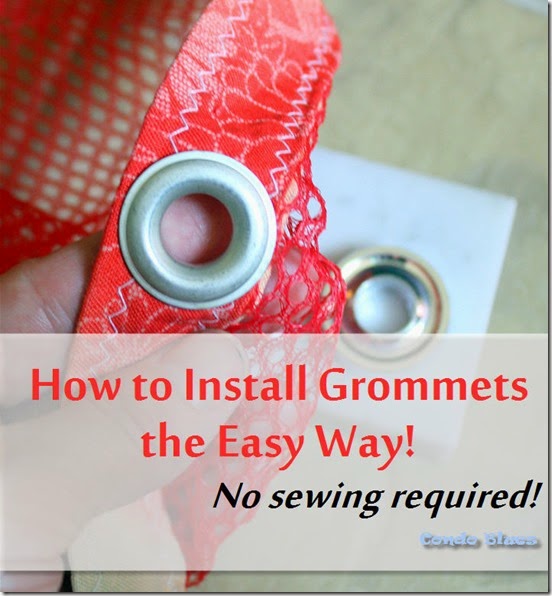
9. Set two grommets (also called eyelets) into the band of the bag using the grommet tool that comes with the grommets. Read my tutorial
How to install grommets if your kit doe not come with clear instructions.
 10.
10. Sew a piece of the hook side of hook and loop tape to the back side of the fabric band. This will help keep your trunk organizer in place and against the carpeted wall of your car trunk.
 Warning: This will not be strong enough to keep the organizer full of stuff attached to the side of your car trunk. Guess how I know? That’s why we need Step 11.
11. Attach the magnet hooks to the metal sides of your trunk, hang the cargo net up, and get that organize that junk in your trunk!
This is such an easy way to organize the stuff in our car and make sure it stays put! I made two net car organizers for each side of our trunk. One cargo net keeps our reusable shopping bags organized. The other cargo net keeps our picnic blanket, Frisbee and toys, and car seat covers from sliding all and hiding fetid orange juice containers for days on end.

Easy organization. Love that!
The net organizers are easy to remove if we need extra room in the trunk for a trip or when I buy something big at the home improvement store.
How do you keep your car organized?
Did you enjoy this post? Get more like it by
subscribing to the Condo Blues RSS Feed or to
Condo Blues by Email.


 Pin me!


