During our bathroom renovations the bed in the guest room/craft room has become a de facto storage area that also holds crafty bits.
Who am I kidding?
The bed is a dumping ground. It is a mess and it is driving me nuts.
Fortunately I have a great spot for a wall shelf to store the crafty bits above the closet door if I use a floating shelf. Let’s do it!
How to Make a Quick and Easy Floating Shelf
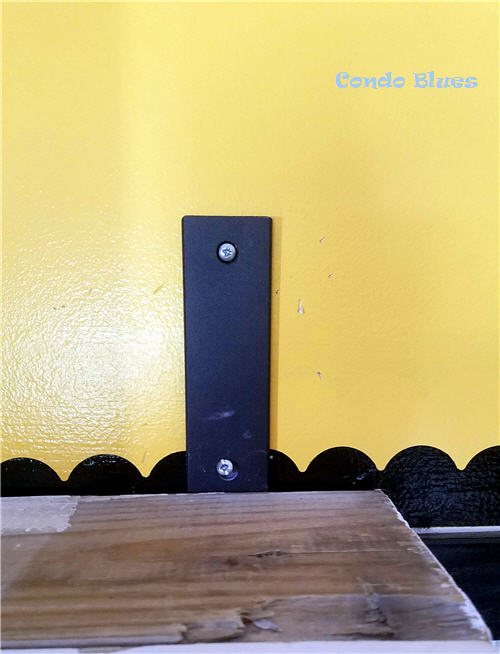
A floating shelf is all about the shelf bracket. They attach flush to the wall with attached shelf supports like the example below. The shelf is a box that slips over the the support bracket and screws in place from the top of the shelf and into the supports to keep the shelf in place.

Floating shelves are my favorite way to use the dead space above doors for extra storage.
You can buy this type of modern floating shelf here. (Disclosure: I am including affiliate links for your convenience.)
Unfortunately the modern look of the box floating shelf won’t quite go with the rustic, farmhouse, and delightfully distressed storage shelves I built from reclaimed wood.
When you can’t built storage out, build up!
I don’t have enough leftover reclaimed wood to build a box floating shelf (and I honestly rather buy one than make it from scratch) but I do have two small reclaimed wood shelves from the bathrooms that I can use to make one a floating shelf using a farmhouse style floating bracket.

I reused the corbel for another decorating project.
Here’s how.
You will need the following supplies
Two 2 x4s cut to the length of your choice. My shelf will be 40 inches long. You can also use one 2 by 8 piece of wood (you’ll need to skip Steps 2 – 4) cut to the length of your choice.
Two 2 inch by 6 inch pieces of wood
Two J hook floating shelf brackets – these are the exact floating J hook shelf brackets I used
Wall anchors and screws – I used these self drilling wall anchors that will hold up to 75 pounds
White paint and paint brush
Wood glue
Wood screws
Screwdriver
Drill and drill bit to drill pilot holes
Pencil
Level
Step by Step How to Make it Tutorial
1. Paint all of the wood pieces the color of your choice with the paint and paint brush as desired – or not. My wood is already perfectly imperfect chippy and worn. You can get that look from newly painted and dry wood by lightly hand sanding the paint off the wood here and there, nicking up the wood with steel wool, by hitting it with a hammer, chain or whatever you find around you until the wood is distressed to your perfection.
2. Put the 2 x 4s side by side. Apply wood glue to one of the 2 inch x 6 inch pieces of wood and center it over the wood seam of your shelf.
3. Use a drill and a small drill bit to drill a pilot hole into each side of the 2 inch x 6 inch piece of wood and use a screw driver and wood screw to screw the wood it into place as the glue dries.
4. Repeat Steps 2 and 3 for the other side of the wood shelf. Allow the wood glue to dry before moving on to Step 5.
5. Using the J Hook shelf brackets as a guide and use the pencil to mark on the wall where you will drill the pilot holes you need to screw the shelf brackets into the wall.
6. For stability it is best to attach the shelf brackets into a wall stud. There aren’t any wall studs where I want to hang this shelf which means I have to drill a pilot hole and use a manual screwdriver to install a wall anchor for each wall screw my shelf brackets require. I like to use a manual screwdriver because I think it bites better into the drywall than using an electric screw gun. They make wall anchors rated to hold lighter and heavier loads than the type I am using for this project so you may adjust up or down as your project requires. Frankly, 75 pound wall anchors are a little overkill for the yarn I plan to store on this shelf but it is what I already have in my shop and gives me the option to put something a little heavier on the shelf in the future if I want.
7. Use the screw driver to attach each shelf bracket to the wall (anchor if needed.)
8. Center the wood shelf onto the brackets, the drill to drill a pilot hole into the underside of the shelf for each screw, and use the screw driver to screw the shelf to the bracket.
9. Get organized!
Looking for more floating wall shelf and storage ideas? Check out the following options – and more! – below!
Did you enjoy this post? Get more like it by subscribing to the Condo Blues RSS Feed .


No comments :
Post a Comment
I love comments and read them all! If you’re shy and don’t want your opinions made public, you can always email me at condoblues [at] gmail [dot] com.