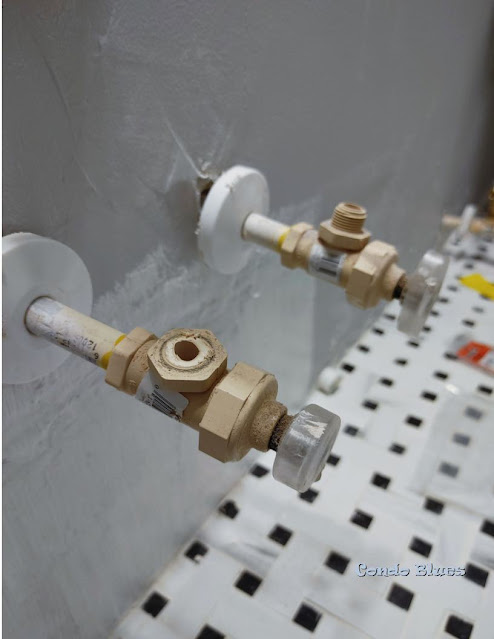
The CPVC water shutoff valves that came with my house are prone to leaking. I always give them an extra tight twist with my wrench which usually solves the problem.
Or makes a bigger problem when I accidentally snapped the threads off a bathroom valve when I installed our bidet (I bought this exact Lux Bidet attachment – it is life changing!) (Disclosure: I am including affiliate links for your convenience.)
I jumped in the car and grumbled my way down to Lowes that I’m now in a situation where I have to wait on a plumber to replace the valve buy instead of finishing the bidet installation like I planned. Well, at least I have the chance to replace all of the cruddy PVC shutoffs with sturdy metal water valves we’ve been talking about.
I figure I can make the plumber’s job a little easier (and a little cheaper for me) if I buy replacement stop valves before I made the appointment. I’m not confident enough in my soldering skills to do the job myself and not burn down the house in the process.
As I stood in my second home for the month (the plumbing aisle) the wonderful, wonderful plumbing department person told me about a metal shutoff valve I can install myself that literally slides onto the bare pipe and stays put without solder or PVC adhesive. I could have kissed the guy! (But it didn’t, nor did I jump into his arms cartoon style to give him a hug even though I wanted to because he was walking me through the installation process.) I bought a contractor pack of valves and practically floated home with joy knowing I could replace all of the cruddy CPVC plumbing valves in the bathroom the second I got home. The the bidet project is back on track!
Save this DIY plumbing tutorial to your Pinterest boards for later!
Share it with your friends!
So I did.
How to Replace CPVC Water Shutoff Valves without Adhesives
You will need the following tools for this project:
Sharkbite push to connect plumbing stop valve made to fit the diameter of your CPVC plumbing pipe. (You can learn more about the Sharkbite plumbing valves I used here)
Mini hacksaw (I have this kind of mini hack saw ) or a PVC pipe cutting tool that looks this
Old towels and a bucket to catch leftover water in the plumbing
Helpful things to have but not required:
Sharkbite depth gauge and pipe deburring tool you can find it here
Sharkbite disconnect tool you can find it here
Silicone self fusing tape like this kind . The Sharkbite valves are not supposed to leak if you install them correctly. Since almost all of the original PVC shutoff valves in my house have micro leaks in one way or another I wrapped them in silicone fusing tape to make them more water tight. I figure it’s best to over do it on the new stop valves because I never, ever want to replace a moldy vanity, drywall, and sub floor again. Tape is cheap. Black mold remediation is an expensive pain.
Step By Step How to Replace a DIY Plumbing Shutoff Valve
I should remind you that I am not a professional licensed plumber. If you do not feel comfortable doing plumbing projects and this project in particular, please call a professional plumber and have them do the job for you.
1. Turn off the main water supply to your house and turn off the water at the stop valve you want to replace unless you want an accidental face full of water which isn’t fun.
2. Put an old towel and bucket under the stop valve want to replace. Open the stop valve and drain any water that may still be in the pipe into the bucket.
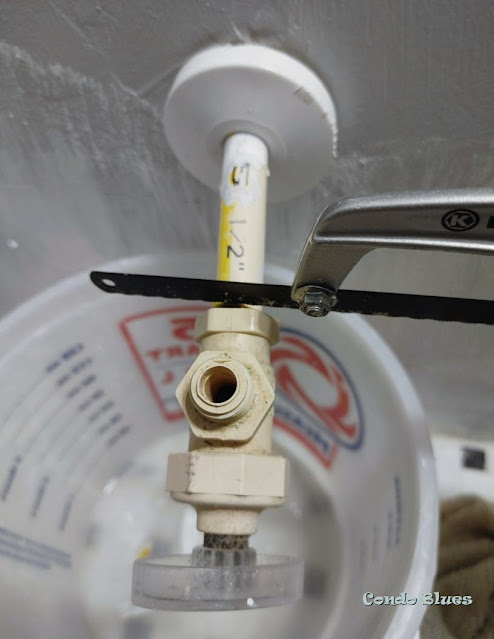
3. Cut the current stop valve from the plumbing pipe using the mini hacksaw
or pipe cutter. Make sure to leave at least one inch of pipe coming
from the wall.
It is very important to cut the pipe as evenly and cleanly as
possible.
If you accidentally cut the pipe at a slight angle or leave burs on the
pipe, the new valve may leak after you install it. Guess how I know?
4. Optional: Use a deburring tool (if desired) or your hands to remove any shavings or burrs from the cut pipe as needed. Fortunately I was able to use a gloved hand to remove all of the PVC shavings. If you are working with copper pipe or fine burrs you may want to invest in the deburring tool.
Tip: You can also check that you have enough exposed pipe available to install the new stop valve with a depth gauge that comes on the deburring tool if desired. I skipped this step because it is pretty clear by just looking at the length of my plumbing lines coming out of the wall that I have more than one inch available to install the new stop valve.
5. Install the Sharkbite stop valve by pushing the valve fully and directly onto the CPVC plumbing pipe. You should feel the “teeth” inside the fitting bite into the pipe.
6. Put a bucket under the new stop valve and turn the water back on at the main. Open the new stop valve. If the valve leaks, turn off the water and use Sharkbite disconnect tool to remove the valve and correct the error. My case, there was a tiny angle when I cut the valve off the pipe I installed and I had to cut that pipe again so it was even to fix the leak. I learned my lesson on the first valve installation and cut the others more carefully, thoroughly cleaned all of the burrs off the cut pipes, and didn’t have any leaks after installation. Learn from my mistake!
7. As I precaution against micro leaks that got me into this renovation in the first place, I wrapped where the stop valve and the water pipe meet with silicone fusing tape to seal it and installed the cap over it. Sharkbite says you don’t have to do this but I’d rather be overly cautious and avoid future repairs when I can.
One down, four more to go! Best of all, metal shut off valves that do not leak!
Looking for more plumbing valve installation ideas and tools, check out the following options – and more! - below!
Did you enjoy this post? Get more like it by subscribing to the Condo Blues RSS Feed .


2 comments :
You always seem to have such helpful instructions. You make things look pretty easy.
Pinned! Doing some faucet repairs and replacements soon. thanks for the tips!
Post a Comment
I love comments and read them all! If you’re shy and don’t want your opinions made public, you can always email me at condoblues [at] gmail [dot] com.