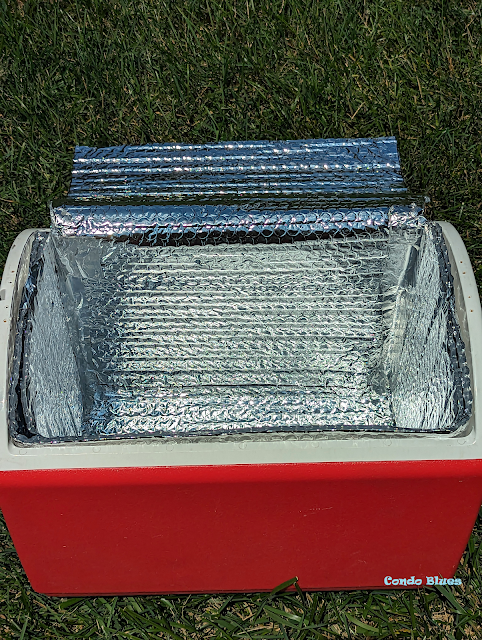
Our coolers don't keep food cold enough for as long as we'd like. While the body has insulation, the lids do not. I began searching for an upgrade.
When it comes to coolers and cold boxes, it seems there are only two options:
1. Fairly cheap eskies with minimal insulation in the lid and body that only keep food cold for a day or less.
2. Expensive chilly bins that are heavily insulated, bear-proof, and keep food cold for almost a week.
While I value quality, I don't want to spend hundreds of dollars just to keep food cold for a few weekends a year. Additionally, I'm struggling to find a well-insulated cooler in the compact size of our favorite Playmate cooler.
Wondering if you can insulate a Playmate cooler to match the performance of a Yeti cooler? Yes you can! Not only that, but your DIY Yeti cooler will also weigh much less when it is empty.
Here's how to do it.
How to Hack a Cooler to Make it Colder
You will need the following:
Cooler
Bubble Reflective Insulation – you can buy foil insulation by the roll here
Aluminum foil tape – you can buy foil tape here
Tape measure
Scissors
Sharpie Marker
Optional: Spray foam insulation – Learn about my favorite spray foam insulation Great Stuff here
Drill and drill bit
(Disclosure: I am including affiliate links for your convenience.)
Step by Step How to Insulate a Cheap Cooler Tutorial
1. Use the tape measure to measure the inside length and width of the sides of your cooler as well as the bottom. Since my Playmate cooler has absolutely zero insulation in top, I measured across the top of the open cooler to create a cold flap to cover the top.
2. Use the ruler and Sharpie Marker to transfer the measurements to the reflective bubble insulation.
Two sides of my Playmate cooler walls are higher than the others. I found it easier in the long run to draw the measurement of the highest wall on the reflective bubble insulation and trim it to fit later made the process easier.
3. Use the scissors to cut the reflective bubble insulation to shape.
Then cut out the corners.
4. Fold the reflective bubble insulation along the lines to create a box shape.
After doing a dry fit, I cut the side ‘box’ flaps in half to reduce the bulk on the sides of the folds.
5. Use the aluminum foil tape to tape the seams together and to create a box.
6. Place the insulated box inside the cooler.
When placing food and ice in the cooler, (I use these exact reusable ice blocks for our coolers) cover the top of your food and drink with the top flap of the insulated box.I added a few inches to that measurement to create a small flap that can be tucked into the inside of the cooler for added security
I used the same technique to make an insulated liner for our larger Coleman cooler with a few exceptions:
The lid to my Coleman cooler uses an air gap in the lid for insulation while the sides and bottom of the cooler are filled with insulation. As you can imagine, the air gap is less efficient than the areas that have the physical insulation.
There are two ways you can insulate the hollow lid of a cooler:
-
You can drill a few holes in the sides of the cooler’s lid big enough to fit the straw nozzle on a can of spray foam insulation and use the holes to fill the inside of the hollow cooler lid with expanding foam insulation. Allow the spray foam to harden for 24 hours and remove any spray foam insulation that has expanded out of the holes. This technique can be a little messy but it works well.
Drilling one hole in each side of the cooler lid will help you spray the expanding insulated foam inside the entire cooler lid.
-
I used this food safe adhesive to glue two layers of reflective bubble insulation to the inside of the cooler lid instead of making a fold over flap on the insulated liner like I did with my Playmate cooler.
This technique works as well as the spray foam insulation, is less messy, and most importantly, I already had it on hand.
How does a homemade insulated Yeti type cooler perform? Much, much better with the added insulation! Our food stayed much colder and for longer in the DIY insulated Playmate cooler on yesterday’s adventure than it ever has before.
I used the same technique to create insulated slip covers for the outside of each cooler if we want to an optional DIY double insulated Yeti cooler use for longer multi day adventures. I had leftover materials and figured, why not?
So, yeah. I’m loving that I made two insulated Yeti-like coolers for around 20 bucks, which is a much better price than buying one Yeti cooler for $500!
Did you enjoy this post? Get more like it by subscribing to the Condo Blues RSS Feed .


No comments :
Post a Comment
I love comments and read them all! If you’re shy and don’t want your opinions made public, you can always email me at condoblues [at] gmail [dot] com.