I am playing a gnome at a renaissance festival. It’s a fun project because I’m a second generation Danish American and nisse (what the Danish call gnomes. Some countries also call them tomte) are something we celebrate all year round but especially at Christmas when we thank the nisser (plural for nisse) for protecting the family and helping farms prosper with a bowl of rice porridge with a pat of butter on top on Christmas Eve (similar to American kids leaving cookies and milk out for Santa.)
That’s why some non Scandinavians call them Christmas Gnomes when in reality, there is no such thing as a Christmas, Halloween, Easter, etc. gnome. Gnomes are just gnomes all year round (similar to Irish leprechauns. They are dress and act the same year round too.)
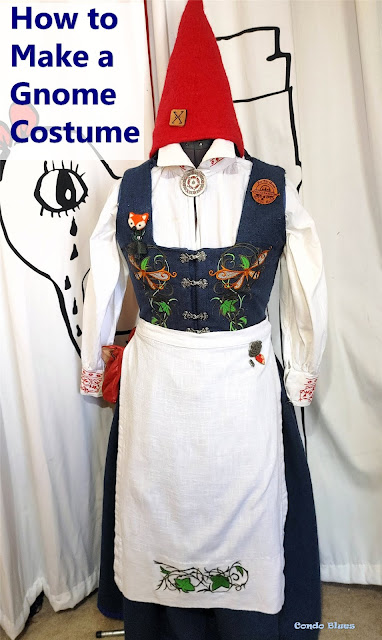
Traditionally gnomes look like a little man (with or without beard) or woman wearing a red hat, a red, blue, or gray Scandinavian peasant tunic/bodice and skirt, and is the about the size of an 8 to 10 year old child. This is what I am using as the start of my women’s gnome costume while making it in a 16th century silhouette with Scandinavian elements (more difficult than it sounds because the Danish national costume is different by region and based on clothing from the 17th to 19th centuries.)
I have the added challenge of designing a mythical creature described as looking like a small human (at least I have that part down!) like she belongs with a group of Shakespearean fairies who have very elaborate makeup which doesn’t work for a gnome. I’m required to have rosy red cheeks (which I’d rather not do at all but I’d rather that than being required to airbrush all of my exposed skin a different color) and wear my hair in braids (I bought these cute rose metal hair hooks to hide my modern hair ties.) (Disclosure: I am including affiliate links in this post for your convenience.)
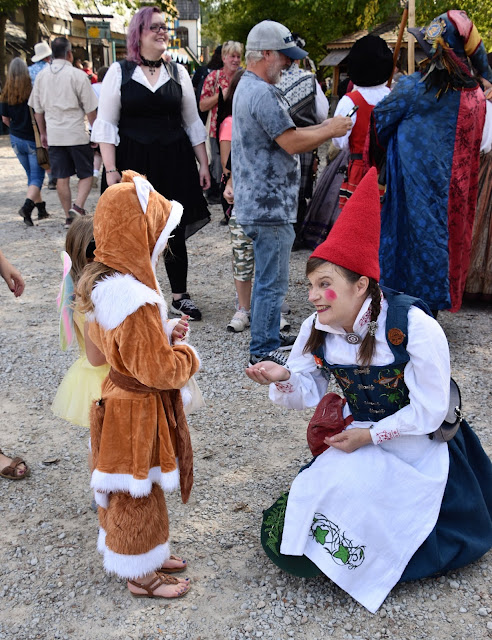
Family entertainment from the Fae Family! Sprout, the Seed Fairy (left,) Fawn the Fairy of Fluffy Animals (center,) and me as Nissa the Gnome (right.) Photo courtesy of Steven Kohus
I figured the best way to look like I am a member of this fae family while still being faithful to gnomes is to go nuts with fairy aesthetic props and detailed embroidery on my clothing.
DIY Gnome Costume
I made everything I am wearing except my gnome hat, socks, shoes, and jewelry.
Layer 1 – Modern athletic sweat wicking unmentionables and tank top to keep cool in summer. I switch to winter wicking base layers when it cold. I like 32 Degrees base layers because their heat and cold products work just as well as Under Armor for a much cheaper price. I appreciate this because I have to cut my shirts so they don’t show under my costume. You can learn about 32 Degree Heat and Cold gear here.
Layer 2 – My bloomers are not from the Elizabethan period but necessary because I am extra awesome at tripping and falling flat on my face. I use a pajama pants pattern like this New Look Pajama Pants and Shorts Sewing Pattern 6859 and add elastic to the legs and waist. Trust me you do not want to deal with a drawstring waist under all of those layers in the ladies room!
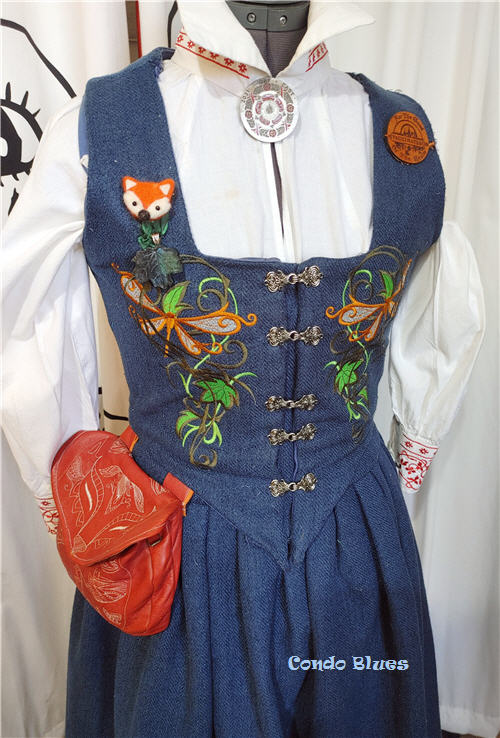
I bought bought this exact 16th century Lady in Green Blackwork Collar embroidery file from Art Embroidery Designs on Etsy for the shift’s collar and cuffs and sewed it as redwork with red embroidery thread. Redwork wasn’t as common as blackwork in the 16th century but redwork embroidery appears in many drawings of lady gnomes. I like how the historical vines tie into the fantasy embroidery patterns on my bodice and apron.
My shirt has a 16th century Danish collar.I made it adding a good 4 to 5 inches on the collar pattern piece of this versatile Easy Nobleman's/Noblewoman's Shirt Sewing Pattern by Alter Years and starching the heck out of the collar when I wash and iron the shift. I added anothere fantasy element with two pewter green man buttons from my stash (you can buy a variety of pewter buttons here .) Danish women used a pin to close the top of their shirts which makes it a great place to wear the cast badge that I’m required to wear.
Sewing machine embroidery tip: When I want to embroider a garment I’m sewing from scratch, I always trace the pattern piece on uncut fabric with a wash out tailor’s pencil like this one
and embroider the uncut fabric (by hand or machine.) That way if the
finished embroidery isn’t quite where I want it to be or matches up, I
can make it so after the fact by changing where I cut the pattern from
the embroidered fabric.
Layer 3 – I needed a new set of stays (corset) and really wanted one that laced in the front so I can dress myself. I squared and lowered the front and back of this this Butterick B4254 Misses' Stays and Corsets pattern so it won’t show under my bodice. Purists may freak out that I’m modifying a commercial 17th corset pattern instead of drafting my own 16th century corset pattern. No matter because it gives me the correct 16th century silhouette, fits like a dream, and was easier than drafting a pattern that fits as well when I was in a time crunch to build everything before dress rehearsal.
I used cotton muslin to make the petticoat with a drawstring waist for less bulk using a basic long skirt pattern like this like this Simplicity Renaissance Dress Costumes Sewing Pattern 5582. I used the same pattern to make my over skirt skirt with a waistband.
Layer 4 – I embroidered a remnant of blue upholstery fabric (for the proper weight and texture of a period fabric) using Sublime Stitching’s Elven Court machine embroidery files on the front and back for fantasy fairy core flair. I added another Danish element and ordered this exact set of Scandinavian Silver Pewter Sweater Clasps to close my bodice instead of English laces.
Since I already had the pattern and know it fits, I altered this exact Alter Year Easy Back Laced Sewing Pattern to close in the front instead of in the back. I planned on cutting the back of the bodice on the fold. Unfortunately one of side of the wing embroidery wasn't level. I was working with a limited amount of fabric so I fixed the embroidery by cutting out two pieces per the original pattern and sewing a center seam.
Layer 5 – I embroidered the apron with another Sublime stitching file in white linen fabric with a pattern similar to view A of this Butterick B5509 Aprons Pattern.
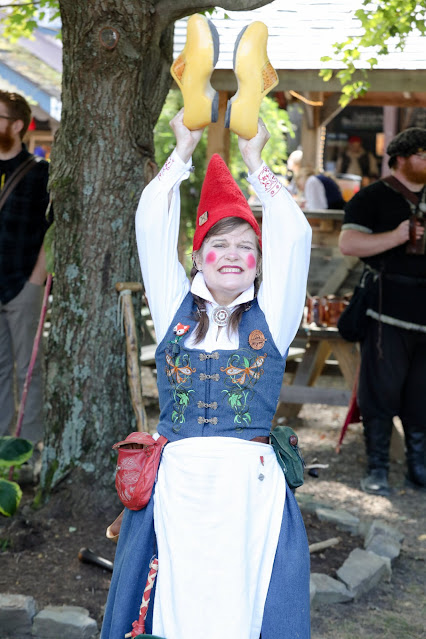
I bought a custom felted wool gnome hat from Tiffany at Bobbin and Spool, wear wood Dutch klompen shoes I got here (many countries wore them besides the Netherlands,) leather klompen socks I bought here (to make the shoes more comfortable. The leather socks are also helpful from keeping the carved wood interior from chewing up my socks,) and these thick alpaca fiber socks which not only make the wood clogs comfortable to wear but also wick wonderfully to keep your feet cool in summer, warm in winter, and are softer than anything!
I finished my gnome costume with several fairy inspired props. I made the leather embroidered fox pouch , a weatherproof canvas ivy leaf parasol, a leaf shaped hand fan, a fairy walking stick, and carry it all around in this exact Farmer’s Harvester Basket Backpack.
The entire project cost $1,700.00.
Rather buy that DIY? Check out these gnome costume ideas and more for men, women, boys, girls, and even your dog below!
Did you enjoy this post? Get more like it by subscribing to the Condo Blues RSS Feed .


3 comments :
Interesting to learn of the traditions.
What a wonderful project! I love your costume - it's so gorgeous! I love the photos you shared, too. Glad you had fun. :) Thank you for sharing at Fiesta Friday party!
your costume is amazing! you took care about every detail! exquisite work! as a child, I would undoubtedly have to believe in gnomes after meeting you <3
Post a Comment
I love comments and read them all! If you’re shy and don’t want your opinions made public, you can always email me at condoblues [at] gmail [dot] com.