I found patches of black mold on our bathroom vanity, wall, and subfloor due to several micro leaks and needed to replace everything in the bathroom.
Which is totally fine because we hated the builder grade bathroom vanity with a passion.
I demoed, replaced and leveled the subfloor, and laid new tile. Now it’s time to update and upgrade the bathroom vanity.
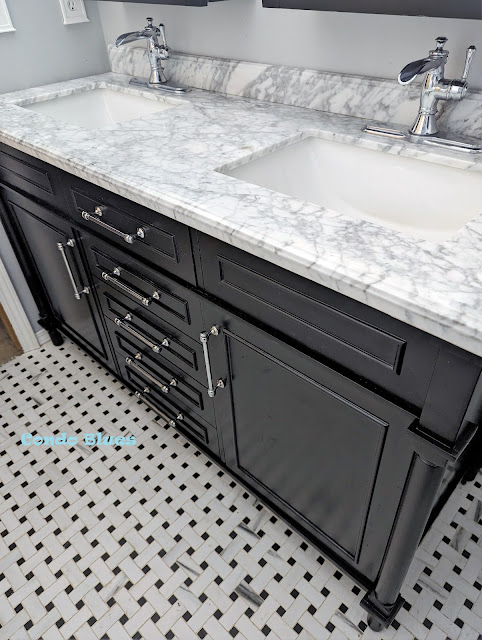
I had many options to replace the old vanity. I could build a new one. I could convert a dresser into a vanity provided I could find one that is long enough. I popped in to the Restore often to see if they had one that would work. But time and time again, I kept coming back to this exact marbled topped double bathroom vanity. I tried to talk myself out of it because that absolutely gorgeous marble top is a soft stone and easily stained but my heart won out. I impatiently waited for it to go on sale. I bought the new vanity and two of these matching mirror medicine cabinets in Espresso. (Disclosure: I am including affiliate links for your convenience.)
For a little modern, yet old world twist, I paired the vanity with two of these Delta Cassidy Open Channel Spout Bathroom Faucets (you can learn about them here.)
The faucet’s escutcheon plate was too short to cover the extra faucet holes that came drilled in the vanity top. The faucet holes were widely set and the only thing that worked was this Kohler 3-Hole Kitchen Faucet Escutcheon Luckily I found an escutcheon that coordinates. You’d never know they were two different brands unless I told you.
I figured my husband and I may struggle to heft the heavy vanity to our upstairs bathroom. Not big deal we’ll take off the doors and top to make it lighter.
Nope.
Turns out the vanity was not just heavy, it was use a forklift from
the delivery truck and into my garage heavy. We couldn’t remove the top
like we thought to make it lighter and there was no way we could get
it to budge on our own (we tried.) We hired two of the best movers
ever to haul the double vanity from the garage and into our bathroom.Thanks strong and funny mover guys!
I thought it would be a quick install because I could just shove the vanity to the wall and install the faucets and plumbing. Easy!
Nope!
The wall valves and drains were juuust a bit out of sync with the openings in the back of the vanity (of course.) After a good think and a lot of measuring and planning to make sure I didn’t drill holes I didn’t need or want in my beautiful, sweet baby, I drilled holes for the plumbing using this hole saw kit on my electric drill for the faucet water lines and drains.
The faucet drain pipes the builder put in never connected together well (and judging from the mold spots, made them leak.) And naturally each bathroom sink had its own personalized weird angles and measurements from the sink to the wall plumbing (that the builder solved by using the exact same thing for both sinks which didn't work well.)
At least I know what not to do for the sink plumbing. I happily tossed the old drain pipes into the trash and may have done a little dance afterward.
OK, I did do a little dance afterward. The neighbors didn't mind. They are used to my antics by now.
I was determined to fix the ill fitting pipe issue during this renovation even if it killed me. Which meant doing some research before I went shopping for plumbing parts.
I wanted a more flexible plumbing drain pipe solution while I was installing it (weird angles meant I wasn't sure exactly what measurement I needed until I was doing it) and to save myself a million trips to the store during this part of the project (since I was practically living in the Lowes plumbing department as it was.) I decided to upgrade the plumbing with this exact Snappy Trap Snappy Trap Universal Drain Kit for Bathroom Sinks.
For the first time since we moved in, the plumbing didn't leak and the inside of the sink cabinets were dry. I don’t want to sound like an ad, but it was such a good experience that I’m in the process of upgrading the drain plumbing in our other bathrooms with Snappy Trap kits. I also plan on using this Snappy Trap kit to replace the drain pipes on my kitchen sink.
Since I chose a bathroom vanity with legs, I didn’t have to drill a hole in the side to run the warm water line from the sink valve to the bidet attachment ton the toilet.
Finally all I had to do was push the vanity next to the wall and attach it to the wall with screws and drywall anchors to reduce the chance of the vanity becoming a tipping hazard.
And now for the new bathroom vanity and faucet reveal!
I could not be happier with this vanity and the open channel faucets. So far, stains haven’t been an issue. I put a small towel on the counter to protect it when I do my makeup which also makes for easy clean up if I go wild and throw powder everywhere. The absolute best part, besides the style, is the oodles and oodles of storage!
Looking for more bathroom renovation, repair, and decorating ideas? Check out the following options – and more! - below!
Did you enjoy this post? Get more like it by subscribing to the Condo Blues RSS Feed .


No comments :
Post a Comment
I love comments and read them all! If you’re shy and don’t want your opinions made public, you can always email me at condoblues [at] gmail [dot] com.