Condo Blues: tools
Showing posts with label tools. Show all posts

Monday, November 28, 2011

Handy Ma’am Apron

I love spending quality time with my tools. I don’t always love being covered from head to toe in sawdust from those tools. If only there were a way to prevent that.

They have something for that. It’s called an apron.

I made this!

Sunday, November 20, 2011

Trash to Treasure Filing Cabinet

I am the reason we do not have nice things.


 I rebuilt and made over this thrift store filing cabinet after breaking the old one too many times.

Why? Because I snapped the plastic, handle off this filing cabinet drawer almost as soon as we got it home.
Photobucket
Uncle Bob?

My Green DIY Diva powers came to the rescue! I spiffed up a set of sturdy second hand cabinet handles with paint, attached them to the drawer fronts, and Bob’s your uncle. 
  • A little later a drawer broke; Husband kvetched we need a less flimsy cabinet. I fixed the drawer.
  • A year later the bottom drawer broke, Husband kvetched we need a less flimsy cabinet. I fixed the drawer.
  • A few months after that the top drawer broke, Husband kvetched we need a less flimsy cabinet. I fixed the drawer.
A drawer broke again. I agreed. We need a less flimsy filing cabinet.

Sunday, November 6, 2011

My Garage Door Opener Might Be the Death of Me

My garage door opener is a fickle minx. When I press the wall button or the remote, I’m not sure what I’m going to get. Most of the time the garage door opener opens and closes the door, as it should. But take that for granted (as I did the night of our burglary) and the door will go down and pop back up. My favorite trick is after checking the batteries in the remote, a press of the button makes the light blink and the door stays open. The taunting blinking light always happens during a rainstorm or when I am in a hurry.

I spend a good chunk of time checking the garage door sensors for obstructions (rare), readjusting the garage door opener controls with the change of the seasons, and keeping the remotes fed with fresh batteries.


A slight turn with a screwdriver is all it takes to make the adjustment

Our burglary was the last straw. I didn’t watch the door to make sure it closed completely. The door popped back up and stayed open all night. That’s how the robbers got into the house while we slept.

Husband and I discussed our options:


Sunday, October 23, 2011

Make Solar Milk Jug Ghosts for Halloween

The rechargeable batteries in the solar garden lights I repainted last summer heaved their last breath. 

While I am searching for outdoor rechargeable batteries,  I need something to light the way for the Trick or Treaters.

Luminaries are simple and festive. However, I don’t want to with traditional candles in case the kids accidentally walk into them. Husband says lighting your neighbor’s children on fire is rude. What-ever.

Sunday, September 18, 2011

Recycled Front Porch and Garden Renovation Reveal !

Husband and I worked on this project all spring and summer. It is finished! I am ready to reveal my summer recycled front yard vegetable garden and Power of Paint Porch renovation project!

 
Finished!


I didn’t expect this to be our big summer project. Things snowballed after Husband and I made it a priority to plant something in the front yard.   This remodel is an example of Slow Decorating. We did each project bit by bit over a year and several months. It is a cash only project.

Thursday, August 11, 2011

The Power of Spray Paint in the Garden

My front yard farm is starting to look like a real garden! The beans, winter squash, and cucumbers are quickly climbing the tepee trellises I built. So far, my covert front yard vegetable garden looks like flowering vines and plants.

Update 8/11/11 1:15 PM: Our Property Manager (AKA The Queen of No) told me she likes my yard and it looks very nice during her monthly drive by. She thought my rain barrel rock was a garden doodad - whew!


It would be nice to see the flowering vines and plants when we sit on the porch at night though.

Once upon a time, my solar garden lights were copper until they faded into a hide in the garage color.

On the bright side, I bought the orange flowers for $2.00 at the Restore. 
They were donated from a garden show. Woot!


Thursday, August 4, 2011

How to Make Tepee Trellises

I planted scarlet runner beans, winter squash, and cucumbers in my covert front yard vegetable garden. The vines are growing! They need trellises.

Grow my pretties! Grow!

Husband and I found functional trellises but were leaning toward something with a little style because they will live in the front yard. The decorative metal trellises were more for what we were going for but did not look sturdy enough to hold heavy winter squash or cucumbers. Oh and the decorative trellises were stupid expensive for flimsy-ish spray painted black metal.

When I can’t buy I DIY!

I promised Husband I would build him a set of tepee trellises for the front yard.

Sunday, July 31, 2011

Wednesday, June 29, 2011

How to Make a Tabletop Cornhole Game

I build a regulation size Cornhole game for Husband’s family reunion last summer.  The game works great for home. It is too big for us to take with us in our small car if we also want to take frivolous things like food to day long summer festivals and picnics.

I drew plans for a tabletop Cornhole game.

Craftsman Blogger Summit
 Build me!

Tuesday, June 14, 2011

I Got Down and Dirty with Frank Fontana

NO!

Not like THAT!


I’ll write a more detailed post on everything we did and all of the new toys tools I saw at the Craftsman DIY Blogger Summit in The Craftsman Experience later. However, if I don’t post something about the event as soon as I get home my dad and father in law might explode with curiosity! 

You don't want exploding Dads so close to Father's Day, BTW.

Wednesday, June 8, 2011

10 Gifts for Men and Women DIYers

I like to give Father’s Day gifts that appeal to my Dad’s DIY side. I would not be able to do all that I do without my father. My first DIY project was building a step stool with my Dad as a toddler so I could reach the bathroom sink and brush my teeth. I’m sure I just handed him screws or something but he said we made it. A tool belt diva was born.


Cue choir of angels singing chainsaws revving.

I put together a list of my top ten DIY Father’s Day gift ideas to help you out based on things I have and find useful, have borrowed and considered not returning, or have on my own personal wish list.


Most weekend DIYers may think wearing a tool belt is overkill. Not so! Most clothing doesn’t have large enough or strong enough pockets to hold screwdrivers, hammer, pliers, and the like when you are up on a ladder trying to do something simple that requires more than one tool. I like the Style N Craft Carpenter’s tool belt  because it is sturdy with rivet reinforcements and has plenty of pockets for tools, screws, and two hammer loops to keep your hammers from hiding or wandering around the project area.

Monday, June 6, 2011

I Built a Birdhouse. It's Kinda Insane.

I’ve been sitting on this news for so long, I’m surprised I haven’t burst by now! Craftsman tools asked me to teach a group of mom and dad bloggers how to use power tools at the Craftsman Blogger Summit this week!

Little ol’ ME!?

*Faints*

It’s part of my lifelong campaign to get women to stop making Honey Do lists and start making Do It Yourself Honey! lists.

Blitzkrieg thinks this is a silly goal and I should put my efforts into something nobler like world domination. *sigh* I really wish he would use his powers for good and not evil. I’m trying to teach him but it’s hard…

Enough about our family drama. You want to see my birdhouse, right?

Wednesday, March 9, 2011

Garage Workshop Transformation Part 1: Paint Walls

Husband and I are going forward with turning part of our garage into a wood workshop for me. We adjusted the budget a bit due to Blitzkrieg’s knee surgery. We still plan to buy as many materials as we can for the project from the Restore.

Some of the storage and insulation extras may wait unless a good sale comes our way. This will be a cash only project.

Here’s the before.

The beer sign is how dudes decorate. That is what Husband told me as he hung it up after I banished it to felt it worked better in the garage.

Tuesday, February 8, 2011

How to Fix a Garage Door Opener

My automatic garage door opener works fine in the summer but never in the winter. When I push the button on the wall or the remote, the garage door opener does one of two things:

  1. The door goes down and pops back up when it reaches the garage floor.
  2. The door doesn’t go down at all. The light blinks and that’s it.
Turns out that these two problems are common with garage door openers in winter. The cold weather causes the metal tracks of your garage door to expand ever so slightly which can knock the sensors and force of your garage door opener out of position just enough so the opener will not work properly in winter.

Fortunately, both issues have very quick fixes and take a less time to complete than a TV commercial break.

Friday, October 29, 2010

Make a (Cute) No Solicitors Sign

One of the drawbacks of living in a condo community with nicely planned blocks of houses with sidewalks is that we are ripe for the picking when it comes to door to door salespeople. Now that it’s election season, it’s becoming downright unbearable! I’ve had more than one person come to the door pimping the same issue despite asking them to please take them off our visitation list. It's not that I'm politically unaware, I am more than you know. It's just that I don't want my Saturday HGTV and DIY Network coffee + snuggling doggie + dream time interrupted three times in one day with a parade of people knocking on my door about the same thing. The worst offenders are the fake water testing companies trying to tell us our water will kill us unless  we buy their product allow them to test our water.

I decided to make a No Solicitors sign.

I bought a frame at Goodwill and sanded it.
 
 It doesn't look like much but this frame is an achievement. I went to Goodwill looking for picture frames and came out of Goodwill with picture frames instead of picture frames plus the dozen other things that tempted me. Yay me!

I used leftover outdoor paint from my porch chair revamp project to paint my picture frame since it will live outside.

Friday, October 8, 2010

Do You Strip Screws? Try an Impact Driver

I am the undisputed Queen of Stripped Screws. I strip screws with a manual screwdriver because I don’t have a lot of strength in my hands. I bought Mommy’s Little Helper, my mega torque electric drill, hoping the extra torque would solve the problem.

I still strip screws from time to time but now with turbo!

After some research, I realized that electric drills commonly strip screws. What I should have been using all along is an impact driver. Unlike an electric drill, an impact driver is made to do one thing and it does it very well: drive screws and hex nuts. It is less likely to strip screws. I say less likely because if you are the Queen of Stripped Screws, you will find a way to strip one when normal people will not. I consider it my gift, my curse.

What is an Impact Driver?


Unlike an electric drill, an impact driver drives the screw by both rotating the drill bit and using concussive blows. Moreover, if you are the Craftsman NEXTEC 12.0 Volt Right Angle Impact Driver you can do it tight little spaces.

 This is a right angle impact driver.  
The Craftsman NEXTEC 12.0 Volt Right Angle Impact Driver to exact.

I found it to be the perfect tool for installing the screws for my curved curtain bracket because my electric drill won’t reach. I’ve tried using a long manual screwdriver but it is impossible to keep on the screw head for more than a few turns at a time and I don’t have the strength in my hands to drive one of those screws into a wall stud.

What the Craftsman Impact Driver Is Not


The Craftsman NEXTEC 12.0 Volt Right Angle Impact Driver is related to the Craftsman Hammerhead Auto Hammer I reviewed. Like the Auto Hammer there may be some confusion about what this powerful and lightweight little tool is designed to do.

  • Craftsman NEXTEC 12.0 Volt Right Angle Impact Driver is not an impact wrench (also known as an impactor, air wrench, air gun, rattle gun, or torque gun) which is commonly used in auto shops to loosen and tighten lug nuts as well as drive screws. Impact wrenches generally need to be connected to an air compressor to work. The Craftsman Right Angle Impact Driver does not. It runs off a 12 volt rechargeable battery.
  • The Craftsman NEXTEC 12.0 Volt Right Angle Impact Driver is also not a hammer drill (also known as a rotary hammer, roto-hammer or impact drill.) Hammer drills are used to drive into material like stone or to break through concrete.
Photobucket
Me using the mother of all hammer drills to break up concrete in my flower bed. 
Generally, we refer to this size as a jackhammer. It was crazy fun to use!

Craftsman Impact Driver Review

Pros

  • The Craftsman NEXTEC 12.0 Volt Right Angle Impact Driver will drive hex nuts as well as screws.
  • The Craftsman NEXTEC 12.0 Volt Right Angle Impact Driver is the most powerful and lightest weight right angel impact driver when I compared it to the store display of a Hitchati and a Ridgid right angle impact driver. The Craftsman and the Hitchati were approximately the same weight. However, this short woman appreciates that the Craftsman impact driver isn’t as monster heavy as the Ridgid. The Ridgid is the heaviest of the three.
  • The Craftsman is also the most powerful of the three right right angle impact drivers. The Craftsman has 700 pounds of torque, followed by the both the Hitachi and the Ridgid which both have 650 pounds of torque.
  • The NEXTEC 12.0 Volt Right Angle Impact Driver is great for tight spaces. I can see using it for future bicycle maintenance especially.

Cons

  • The Craftsman NEXTEC 12.0 Volt Right Angle Impact Driver came with several size heads for hex nuts but only one screwdriver bit, which is what I’d use it for the most. Regular Craftsman screwdriver heads should not be used in the Impact driver because they aren’t made to withstand the concussive force of an impact driver. However, Craftsman told me they will have sets of impact driver screw heads for sale in November. But for the $99.99 price tag, I think they should be included.
  • It comes with only one rechargeable battery. The battery charges quickly and holds its charge for longer than my initial test period. You can buy extra batteries from Craftsman.

Would I Buy a Craftsman Impact Driver?

I’m not afraid to give a tool or anything I review for that matter a thumbs down if it doesn’t work for me. I wondered if the Craftsman NEXTEC 12.0 Volt Right Angle Impact Driver would just be a nifty toy to have instead of something I would use for jobs other than curtain rod brackets since I already have an electric screwdriver, which kinda stinks so I don’t use it. 

Given that the Craftsman Impact Driver is designed so stripping screws is less likely than an electric drill, that it is also less likely the slip off the screwhead and make accidentally countersinking your thumb less likely (trust me that’s a good thing.) I’d buy the Craftsman NEXTEC EXTEC 12.0 Volt Right Angle Impact Driver for the handywoman who doesn't have the strength in her hands (or desire) to drive screws with a manual screwdriver, the older handyman who's losing strength in his hands, or anyone who wants to drive screws the easy way.


Disclosure: Craftsman supplied me with NEXTEC 12.0 Volt Right Angle Impact Driver to facilitate this review. I went to a home improvement store on my own to compare it to other tools. All opinions are my own and longtime readers know I am very opinionated.

Sunday, July 11, 2010

Make a Cornhole Game

Cornhole  is a game that’s similar to horseshoes but uses beanbags. It’s very popular at tailgates and picnics in Ohio and Indiana. I’m not sure why. It’s kitschy rednecky cool in that Jeff Foxworthy You Might Be a Redneck If… sort of way. Maybe because conhole is a game you can easily play and not spill the drink or drop the cheeseburger you’re holding in your other hand?

Photobucket
I built this all by myself!

You can easily make a cornhole game or buy one premade. The store bought boards are called something insipid like Bean Bag Toss Game or Baggo. However part of the whole Cornhole thing is to make the boards or to buy homemade boards from someone else.

I made a set for Mother and Father in-law for our big Family Reunion Weekend because because Father in-law loves nothing more than a reason to get his family together. Cornhole is a game kids and adults can play with each other a little more safely than say, horseshoes.

I also wanted to build the boards because Father in-law gets a kick that I'm the only one in the family that likes DIY as much as he does. He calls me his ToolBelt Diva. *blush*

Making a Cornhole game is simple construction and is a good beginner woodworking project. It’s also a good project if you’re someone like me who’s last project of building something from scratch was 7th grade wood shop.

I used the plans for regulation boards I found on Cornhole Game Players and sewed relegation size and weight bean bags with fabric from my fabric stash I filled them with dried pinto beans instead of the traditional dried feed corn which is still allowed. Oh yes, apparently there is a whole Official Cornhole Association and Tournaments and whatnot. If any of the kids get hooked on Cornhole want to be professional Cornhole players they are good to go courtesy of Aunt Lisa.

Here are a  few tips and helpful hints if you make a Cornhole game.

1. Use two layers of fabric for your beanbags as the directions recommend because they will take a pounding! Instead of using muslin for the liner, I used fabric from an old heavy cotton curtain panel. Make sure that you use the same weight of fabric for all of your beanbags.

Photobucket
I made a paper template to ensure that all of my beanbags are the same size.


2. I don’t have a table saw (pity I know.) However I was able to have the wood cut for me for free when I bought it at Lowes. I think Home Depot also cuts wood if you buy it there. I don’t know if or what they charge for this service.

3. I used stainless steel screws for this project. I did this so the screws wouldn’t rust in case the boards were accidentally left outside in the rain (even though I know this will never happen. I know everyone will treat them like gold instead of treating them like a toy that you throw things at.)

4. Hold the long screws into place using needle nose pliers while you are drilling them into the pilot holes in your boards to ensure you screw them straight down into the boards.


Photobucket
You can use this technique for nails too.

Guess how I know?

Photobucket
I didn't use pilers as a guide and accidently screwed a screw in at an angle.

This screw wouldn’t back out because it uses a star shaped head (a special bit that came with the screws.) I fixed it by cutting the end of the screw off with a Dremel and filling the hole with a dab of wood putty. Which my in-laws didn’t find out about my blunder until I blabbed about it on the Internet. Let’s hear it for full disclosure! (Do I have to disclose that FTC? Because I think I just did.)

5. Older kids may be able to help you with parts of this project but please take all safety precautions for yourself and your kids. If you’re not comfortable doing something please seek out advice from an expert or get a pro because it’s easy to have an accident and get hurt.

Photobucket
I’m showing you this photo again for sympathy.

In fact, I was being Miss Safety First and still accidentally countersunk my thumb when Mommy’s Little Helper (my drill) slipped off a screw head and into my thumb. Fortunately it bled worse than it actually was but it’s a good reminder about safety.

It’s also a good thing to hold over my in-laws heads. I bled for you – be grateful! Even if the construction is a little off :)

6. I recommend using the belt sander the plans call for to sand the edges of the board. I tried using my palm sander and it was slow going. I gave up, bought a belt sander, and sweet baby Jane! It did the job in a short amount of time.

Photobucket
Sweet Baby Jane? Sounds like a good name for my new belt sander.
Hey, they name boats. Why not tools?

7. The plans had very complicated directions what to use and not use to draw and cut the hole in the boards. I grabbed a 6-inch plastic lid from the kitchen and traced around it with a pencil – problem solved.

Photobucket
A regulation cornhole is 6 inches wide.

8. The plans also had a very complicated directions on how make make the rounded legs. Instead I traced around a small paint can and cut along the line with a jigsaw. Why do guys have to make everything sound so complicated in the workshop?

Photobucket
It’s not brain surgery dude.

9. I painted the boards with outdoor paint I had leftover from my porch chair revamp. I built the boards and legs first. Then I painted them and let them dry before I bolted the legs to the boards, which made life a lot easier.

I  took the game to my in-laws farm and it was big hit with everyone in attendance. I’m sure we’ll get a lot of use out of it for years to come.

Hey FTC: The stores and brands I mentioned in this post didn’t pay me to mention them because they don’t even know I exist at the corporate level (tragic, considering my local stores know me very well. I spend lots of my money there.) I bought everything with my own money with the exception of the Dremel and the Mouse because I got those as Christmas gifts. Exactly how do it report that?


Did you enjoy this post? Get more like it by subscribing to the Condo Blues RSS Feed  or to Condo Blues by Email.

Visit thecsiproject.com

Sunday, June 20, 2010

Chalkboard Paint Outlet Covers

After I painted my kitchen backsplash with black chalkboard paint I looked at my white plastic outlet covers – they just would not do. The white plastic was just too high contrast with the black chalkboard wall.


Keep reading! I'll teach you how to paint shiny plastic outlet covers with chalkboard paint.


I wonder if I can save a few bucks and reuse what I have (very green BTW) and paint those cheap plastic outlet covers with chalkboard paint to match the wall?

White plaste builder outlet covers.

I took off the gloss with steel wool. Sandpaper works too. I used steel wool because it was only two steps to my right under the kitchen sink instead of six steps to my left in the garage. You know I am all about saving energy, fossil fuels as well as my own.

I grabbed a variety of items from the recycling bin to use as risers to make painting and priming the outlet covers easier. I primed the outlet covers using the same grey colored primer I used for the walls. Using a colored primer under a dark top coat reduces the number of extra coats of paint you will need to get nice even coverage.

Gray primer.


Once the primer was dry, I painted the outlet covers with two coats of chalkboard paint.

Black chalkboard paint outlet covers!


When everything was dry, I screwed them into the wall with the original screws and dabbed a bit a black paint on the black screws so they would match.


They blend nicely into the wall. I can draw on them too.

Ta Da! The matching chalkboard outlet covers was the final addition to my chalkboard backsplash that appears in the July/August 2010 issue of This Old House Magazine!


I'm in the July/August 2010 issue of This Old House Magazine.


I’m kinda of hooked on chalkboard paint. What shall I do next? I’m eyeing the refrigerator…


Did you enjoy this post? Get more like it by subscribing to the Condo Blues RSS Feed  or to Condo Blues by Email.


Sunday, June 6, 2010

How to use a Rototiller

My in laws do a big garden every year. Husband says that they have had a garden for as long as he can remember.

Father in law had a heath situation. He is recovering and on physical restrictions for the rest of the year. (Since I did not ask if I could write about it, I am not going to mention the details, only to say things got scary and surgery was involved.) My in laws did not think they would put in a garden this year because Father in law should not till the garden bed with the rototiller. Husband is still recovering from his running injury, so he is out too.

While farming and country life is not for me because I am allergic to everything that is green (oh the irony!) it is Mother and Father in law’s Little Slice of Heaven. I will do everything I can to make sure that they keep it for as long as they want.

I volunteered to till their garden with this monster.

Told you the garden was big!

What I don’t have in rototiller knowledge, I make up for in enthusiasm.

I was very enthusiastic.

I took off my safety equipment for the photo.

Have I mentioned I have never actually used a rototiller before? But I have gardened with a jackjammer how hard could this be?

I needed help getting the big thing started because it has a pull cord like a lawn mower and I have arm muscles made out of macaroni. There are two hand controls on the rototiller I used one for forward and other is for reverse. Each control has a safety feature - if you let go of either control the rototiller stops so you are less likely to chop off your feet if the thing backs up into you too fast.

My plan was push it in front of me like a lawn mower and let the rotating blades churn up the soil. Then we could easily hand pick the weeds and Mother in law could start planting.

Mother in law called these carrot seeds imbedded in paper strips “stripper carrots.” Husband got mad because he thought I was using salty language in front of his Mom because she is a saint (she is.) They cost a little more than loose seeds, but you do not have to thin the plants out later like with planting loose carrot seeds. They are worth the extra money.

My plan worked well until the farmer who rents Mom and Dad’s fields for extra planting stopped by and watched as I tried to churn up the soil and avoid some volunteer lettuce, a row of growing garlic and rhubarb. The obstacle course made this Advanced Rototilling when I clearly was supposed to be in the Beginner’s Course. No pressure trying to learn how to use a tiller in front of a professional farmer!

A few things I learned:
  • Wear ear protection because gas powered rototillers are LOUD!
  • You may need to do one than one pass with the tiller in your garden. I did the first pass just walking through the garden with the tiller in front of me to break the soil into bigger chunks. Those are the photos you see here. I did a longer second pass to break the big dirt chunks into little chunks the next day. 
  • If we wanted to add soil amendments like compost it is best to add them after the first full pass with the tiller and work them into the soil with the rototiller on the second pass. I didn’t do this because well, look at that naturally dark, rich soil! (And their compost heap is still composting.) 
  • To break the big dirt clods into wee little dirt clods, I pushed down slightly on the rototiller handles so the tiller was at a slight angle. This way, the blades are working the dirt clods I tilled on the top of the soil and the blades are not digging deeper into the soil and making a deeper ditch. 
  • If you have adjustable blades on the rototiller you are using, you can set them to till deeper on the first pass and shallower in the second pass to avoid the angle thing I had to do. Shut the machine down when you reset the blades for safety’s sake please! 
  • To turn corners in tight spaces (and to avoid the garlic) I found it better to put the tiller in reverse, take a few steps back, and then do a pivot turn in the direction I wanted to go instead of trying to heft the tiller with brute force – which I lack. 
  • If you are in a situation where someone wants to micromanage or Armchair Quarterback you through a project like Father in Law and the farmer were trying to do, use a very loud tool so you cannot hear them! As Mother in law and the Mennonite lady neighbor (who was duly impressed I took on such a task), commented, “Like they did it perfectly the first time.” Nah. Solidarity my sisters! Girl Power!
Why yes I AM pretty darn pleased with myself!

Mother in law rewarded my efforts with some rhubarb that I miraculously did not till under.

Rhubarb crumble hot from the oven and plopped on vanilla ice cream!

I used the rhubarb to make The Green Phone Booth’s Rhubarb Crumble. While it was baking Husband insisted that we serve it over vanilla ice cream and ran off to the store to buy Ohio made ice cream. He was right. The ice cream was the perfect compliment to a very delicious end. I love it when a plan comes together!


Did you enjoy this post? Get more like it by subscribing to the Condo Blues RSS Feed  or to Condo Blues by Email.

If you are joining us from Something I Whipped Up Monday, Metamorphosis Monday, The Persimmon Perch, Market Yourself Monday, Made By You Monday, Marketing Mondays, Craftastic MondaysTrash to Treasure TuesdayToday's Creative Blog,  The Girl Creative, Toot Your Horn Tuesday, Second Time Around Tuesday Show and Tell, Tools are for Women TooTip Me Tuesday, or  Penny Pinching Party Welcome!

Sunday, May 23, 2010

How to Make a Compost Bin Out of a Plastic Storage Tub

My Home Owners Association (HOA)  lawn service killed the compost bin I made from a garbage can with a lawn mower last summer.

A moment of silence please.

During the winter I researched and pseudo-shopped for a replacement. A Bokashi Bin like this one looked interesting but higher maintenance than my old college boyfriend. (Disclosure: I am including affiliate links for your convenience.)

A worm compost bin (learn more about it here) would freeze in my garage. I didn’t want to be known as a Stewart of the Earth and Mass Worm Murderer. A tumbling compost would work best for us, and if it was smaller than the garbage can model that would be perfect.

I had my heart set on an electric composter similar to these because I liked that it did all of the mixing and tumbling for me and you got a batch of compost every few weeks instead of my year long wait till it rots method.

But before I make the spendy investment I vowed that if I can get the green to brown ratio right, don’t have slime mold or maggots, and get at least one batch of compost out of a new homemade compost bin then I will consider buying the electric composter. Don’t judge me Internet. I know I’m a little more than pathetic because I dream of compost bins instead something important like world peace.

 
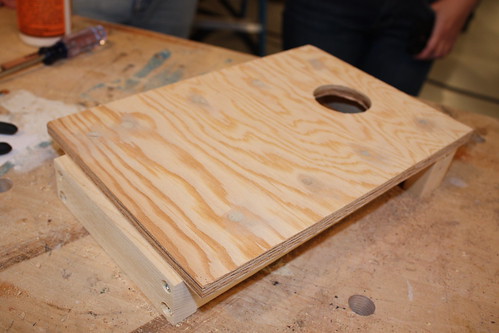
Pin this tutorial for reference!