
Bonus points if it includes using tools. Projects involving hammers is cheaper than therapy I always say!
10 Home Improvement Projects that Save a Ton of Money

Think of these as options, not absolutes. Have a different money saving idea? Share it with us in the comments below!
1 .Start a garden – This one won’t pay off immediately because you have to wait for the fruit, vegetable, and herb plants to grow but even growing a few herbs like I do on my small patio can save money on your grocery bill later on down the road.
I maximize my savings by using a dehydrator like this one to dry my garden herbs throughout the summer to use in cooking throughout the year. (Disclosure: I am including affiliate links in this post for your convenience.)

I’d rather grow spendy herbs them instead of shelling out the big bucks to buy them!
2. Save money on your heating and cooling bills by weather stripping the gap in a sliding glass door. Cold is drawn to hot and vice versa meaning the unrestricted gap between sliding doors makes it more expensive to heat and cool your home.I closed the gap between my stationary and sliding patio door by attaching silicone sealing strip weather stripping like this to the back side of sliding door. I prefer silicone weather stripping over the foam and fabric type because the silicone is shaped like a bottom door sweep for better insulation and is less likely to fall apart with normal wear and tear.

If you can peel and stick, then you can do this project!
3. Clean your dryer vent with a dryer vent brush like this one to keep lint from blocking clothes dryer and making it use more energy to dry a load of laundry. This 10 minute project will also lessen the chance of lint buildup causing dryer fires.

4. And speaking of dryer vents, upgrade leaky dryer vents to an energy efficient dryer vent that seals in between uses. My laundry room was always freezing cold during the winter! I often hear the door that was supposed to seal the vent after use flap in the breeze. Once I upgraded to this exact energy efficient dryer vent I noticed a dramatic difference in the temperature in that room year round!
5. Save money watering your garden and landscaping a rain gage. Most flower, vegetable, and herb plants need at least 2 inches of water every 3 to 4 days. It was hard for me to know if a rainy day provided enough water for my plants. I’m sad to say I often guessed wrong and my plants suffered and died because of it until I stuck a rain gage in a garden. I use a simple tube rain gage similar to this one but you can get fancy and use a wireless rain gage with your home assistant like these. Very cool!

This simple rain gage is the only way I remember that plants need water to live.
6. Save money on water for your garden, landscaping, washing the car, with a rain barrel or two when possible. My rain barrel was crazy easy to install and has paid for itself several times over in free water from the sky instead of city water to water my flowers and garden. Rain barrels don’t have to be ugly eyesores. Mine looks like a big rock garden ornament. You can check out decorative rain barrels here and don’t forget a soaker hose like this one to make watering even easier!
7. Make free lawn and garden fertilizer the lazy with a compost bin. When we first bought our house the soil was nothing but clay, everything kept dying, and finally got healthy soil by adding compost over the years.
Composting is very simple. Add one part fruit, vegetable, and food scrapes to the bin (no meat or dairy or it will attract unwanted animals) to two or more parts dry nitrogen rich brown material like grass or plant clippings, paper, cardboard,etc. and let the whole thing break down until it looks and smells like dirt.
You can speed the composting process along by shredding paper and cardboard before putting it in the bin (I use a cross cut paper shredder like this one,) use a tumbling compost bin like this one, or turn your stationary compost pile (you can check out several styles of compost turning tools here.)

Composting is also a good incentive to eat more vegetables and cook from home which also saves money on our grocery bill!
8. Save money on groceries and go fishing. Fishing is a relativity cheap hobby. If you go often enough you can stock your freezer with almost free healthy food that will last a very long time!9. Save money on your heating and cooling bills by insulating your garage door. Instead of spending the big bucks (and hassle) on a replacement insulated garage door, I used this exact garage door insulation kit to insulate my garage door. It really made a difference in my garage in both summer and winter. Yay, extended workshop time!

I have a two car garage and needed two kits to do the job. It is absolutely worth it.
10. Save money on your heating and cooling bills by sealing air leaks on the outside of your house. It is a very simple project. Just walk around the outside of your house and check for gaps around outlets, faucets, door and window frames, etc.

This one still looks pretty good.
If you find a gap, fill it with a bead of silicone caulk like this kind or it if is larger, expanding spray foam. I recommend using Great Stuff Spray Foam (learn more about it here) because it dries within 24 hours and cures quickly. Dap does not.

Looks like I forgot to caulk the gap around the outdoor let on the porch. Better get on that.
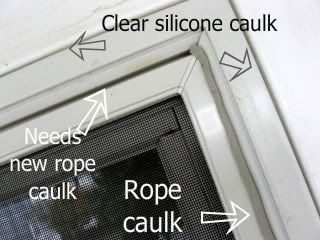
If you want something more temporary if you rent, fill the air leak gaps with removable rope caulk (you can buy it here) like I did between the window screen and window frame shown here. I used rope caulk over peel able removable caulk because I could still easily pop out the window screen from the inside of the house in the case of an emergency. I also don’t have to buy pealable caulk (learn more about it here) each season. I can remove and save the rope caulk from season to season if need be. This is an excellent solution for renters too.
Please keep ignoring the dirt around my windows. Thank you.
For more money saving DIY ideas check out the following options – and more! - below!Did you enjoy this post? Get more like it by subscribing to the Condo Blues RSS Feed or to Condo Blues by Email.
3 comments :
Great tips, thank you for sharing at The Really Crafty Link Party.
Good tips!
Great tips, thanks!
Post a Comment
I love comments and read them all! If you’re shy and don’t want your opinions made public, you can always email me at condoblues [at] gmail [dot] com.