Condo Blues: tile
Showing posts with label tile. Show all posts

Thursday, April 7, 2022

How to Repair and Replace a Moldy Bathroom Floor

 My master bathroom renovation is coming along at a good clip. We had a leak and a little 5 minute flood in our master bathroom. Everything was just wet enough that we had to call in remediators with giant dryers to dry out what couldn't be removed. After they removed the vinyl flooring, they also found batches of mold around the toilet and recommended ripping out all of the flooring down to the joists. Which gave us an opportunity to replace everything in the bathroom from the ground up - literally!

DIY bathroom floor repair
Save this information to your Pinterest board for later! Share it with your friends!

I found more surprises when I removed the bathroom vanityy More leaks and more mold!


How to Repair a Moldy Floor 
I’m not a doctor, but I have the feeling the cause of my constant ear and sinus infections was living under this sink.
 

Working in sections, I unscrewed the sub-flooring from the joists and used an oscillating multi tool to remove the glued flooring from the joists (you can learn more about my Rockwell Oscillating Tool that uses universal blades here which I chose the Rockwell over other brands, TBH.) (Disclosure: I am including affiliate links for your convenience.)

Once I removed the old moldy subfloor, I realized that there wasn’t anything to screw the new flooring to around the edges of the room. I can’t leave it this way or the new floor could slope over time, the tile will crack, and we’d have to start the process all over again. Trust me, once is more than enough! 

I fixed the issue by using construction adhesive and screwing supports along the existing joists and around the toilet flange (this is called sistering.)  

The wax ring underneath the old toilet was smashed to one side (another unknown water leak!) and the floor flange sat at angle around the plumbing. The toilet didn’t sit level and this caused one of leaks and eventually mold.  I figured that possibly going overboard with sistering and adding framing  in between the joists to keep the toilet level is better than taking a shortcut and regretting it later. Wood is cheap. Mistakes are expensive.


how to sister joists

 I can't tell you how tempted I was to stick a toy skeleton down there before I covered it with plywood.

Cutting the subfloor sections to size wasn't difficult because before I removed the original subflooring I cut the tile underlayment to fit and to used the underlayment pieces as a pattern when it came time to cut the new plywood sub floor.

How to install subflooring

A ton of screws, construction adhesives, and bruises later I installed the new subflooring in the bathroom!

I filled the seams in between the sheets of sub flooring with  Fix It All (you learn about this patching compound that’s made specifically for wood sub-floors here)  put on my dust mask, and hand sanded the seams smooth. There were a few random spots that I couldn’t get perfectly level with sanding. I didn’t want to take a chance on the tile floor cracking over time because of it and started prepping the floor for leveling compound by using spray foam insulation to make an expansion joint around the wall of the room and as a barrier around the furnace duct and toilet flange.

how to patch seams in a wood floor

 Patched!

When you are suing self leveler on a wood floor it is the same technique as using self leveler on an uneven concrete floor. Only the type of products you use is different. You need to use a self leveling compound made for wood floors which requires the extra step of priming the entire floor first.

I filled all of the cracks and seams between sheets of plywood with patching compound first. (learn more about the Henry Pre-Mixed Floor Patch I used here ) – If there is even the tiniest sliver or gap, by its very nature the self leveling concrete will find it and drip down into it and make a huge mess. After the patching compound dried I applied self leveling compound primer for wood floors (you can learn more about find Level Pro Underlayment Primer for wood I used here) with a chip brush.

Once it was dry, it was time to don my super sexy concrete work boots and apply the leveler to the floor. This part if fairly easy (pour stuff from a bucket and push it around the room) but nerve wracking because self leveling compound has a 10 to 15 minute window before it starts to dry and is unmovable. Meaning, if you get it wrong outside of that window, it stays wrong. 


 Given the short working window my husband and I teamed up for this project. He mixed the cement leveler in small batches while I poured and worked it around the room.


Success!

how to use self leveling floor compound cemet  

Don't worry if you have swirling or color variations in the dried concrete underlayment. As long as those parts of the floor are hard, dry, solid, and level, you're ready to go to the next step in your project.


Finally it was tile time! I applied same tile underlayment and seam sealering "tape" as I used in our guest bathroom. Yes the orange stuff is more expensive than other options but it is water resistant and the fact that I can cut it on the fly with scissors or a utility knife makes it worth it in my book. You can learn more about the Schlter Ditra underlayment I used here.


how to install waterproof bathroom tile underlayment
Dry fit time!

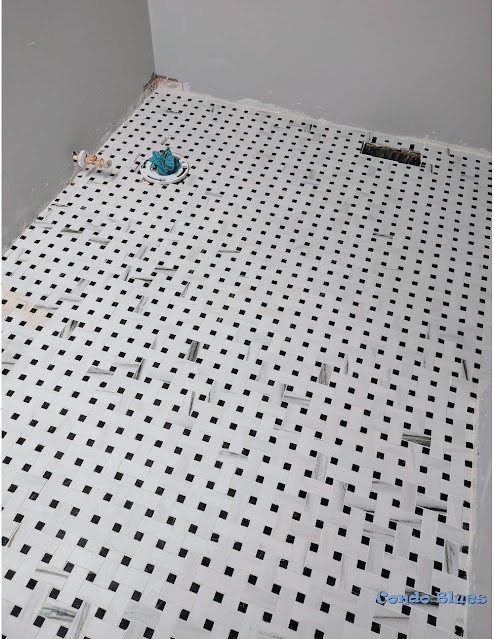
Then it was time to get messy installing the tile floor and grout!


how to grout tile and sealant

I'm using ceramic porcelain tile that looks like marble. I don't need to seal the tile itself according to the manufacturer but it won't hurt if I do.
 

The finishing touch was using this exact spray grout sealer  to seal the grout because is made for moisture laden rooms like bathrooms.

Because I never, ever, ever want to replace a moldy sub floor again.

The next step is installing the new plumbing fixtures and lighting!


Looking for more bathroom floor renovation, organizing, and decorating ideas? Check out the following options - and more! - below!

Did you enjoy this post? Get more like it by subscribing to the Condo Blues RSS Feed .

Thursday, February 10, 2022

How to Seal Tile Grout

I get asked all of the time, do I really need to seal grout?

The answer is yes. 

Yes, you do.

Grout is generally made from a mix of water, sand, and cement (unless you are installing tile with small grout lines like mine which required unsanded grout.) Which means the finished product will dry with microscopic spaces in between the sand/cement and is porous. Water and liquids can seep through and cause mold and mildew on your subfloor and trust me when I say this, it is NOT a fun thing to remove and replace.


This is only one small part of the moldy bathroom subfloor I had to remove and replace. 0/10 do not recommend.


Not to mention, even when dry, if the grout is not sealed it is very easy to remove by getting it wet. That's great when you need to clean hazy tile after grouting it but not great for long term wear and tear. This is why you need to add a sealant to protect the grout from liquids and such.

Fortunately, sealing grout lines couldn't be easier. Here's how to do it.

Thursday, October 1, 2020

Marble Look Porcelain Bathroom Tile and Friday Favorites Linky Party 549

After waiting, waiting, and waiting some more I can finally start working on my next big DIY project - remodeling the Owner's Bathroom in my house because the tile finally came in! Isn't it lovely?

porcelain bathroom tile that looks like marble
I fell in love with this tile pattern in marble but didn't want such a soft and slippery tile in a bathroom. After much hunting, I found this porcelain version with a slight texture to hopefully prevent slipping at a local tile shop.

The Condo Blues World Headquarters and Thunderdome has turned into an Obstacle Course with cabinetry and fixtures stored all around the house for the last two months waiting for the tile to clear customs and Covid quarantine.  Odd because I thought the thing that would hold up this rennovation would be the cabinetry and not the flooring.

I showed you my project! Let's see your fantastic DIY projects, crafting, recipes, and tutorials!

Sunday, April 26, 2020

How to Build Recessed Bathroom Storage Shelves

I never liked the cheap plastic medicine cabinets that came with my condo. I was even more perturbed when I removed the medicine cabinet to paint the walls and found the hole and framing for the cabinet less than square - to put it mildly.

 I figure I better replace it and poked around window shopping while I was searching and pricing every thing else I needed for the guest bathroom remodel.

Have you ever priced medicine cabinets?

Be prepared for some sticker shock. Even the cheaply made medicine cabinets like the one I have are a couple of hundred bucks. The medicine cabinets  made from actual wood are even more expensive while still lacking style. That’s more that I wanted to pay for a medicine cabinet in a second bathroom we don’t use often.

I really don’t need a medicine cabinet with a mirror door because there is a mirror hanging over the sink.  Actually I really don’t need a door either because the way it was installed, the current medicine cabinet door smacks into the bathroom vanity light if we’re not careful. Open bathroom storage shelves are the only answer.

how to replace a medicine cabinet with recessed shelves in a bathroom
Pin this post to your Pinterest boards for later! Share it with your friends!

I stood in the guest bathroom staring at the wall and trying to visualize how to turn the medicine cabinet hole into an open storage niche as pretty yet affordable as possible when I realized I was standing on my answer – use leftover tile from the bathroom floor!

Sunday, February 16, 2020

11 Floor Tiling Mistakes and How to Avoid Them

Tiling a floor is a pretty easy DIY job.

It is also a DIY job that is easy to mess up if you don’t follow a few precautions first. You really don’t want to put in all of the work of tiling a floor only for the tiles to eventually come loose or crack after the job is done.

how to tile a bathroom floor
Save these handy floor tile tips to your Pinterest boards for later! Share them with your friends!


1. Not adding an extra 10% of tile to your tile order – Depending upon the design, you may need extra to match up the pattern in the room. It is also good to have extra tile on hand just in case you cut one incorrectly or worse drop one and break it.

Sunday, January 26, 2020

How to Prep a Wood Subfloor for New Tile

Just like painting a wall, the success or failure of your floor tiling project depends upon how well you prepare the surface for the tile itself. The more care and consideration you take when installing the tile underlayment, the better.

Flooring underlayment is the layer of material that sits in between the subfloor and the flooring material. As tempting as it may be to skip the underlayment – don’t. The underlayment layer is what keeps your floor tile from shifting and cracking over time.

And trust me, after the killer backache preparing and tiling this floor gave me, it is NOT something I want to completely redo if I don’t have to!

Fortunately, preparing a floor for tile by installing underlayment isn’t difficult to do and once you finish the job you can immediately go into tiling the floor.


how to install waterproof bathroom tile underpayment
Save this post to your Pinterest boards for later! Share it with your friends!

How to Lay Bathroom Tile Underlayment the Easy Way!